Tag: linux

  • 7 Reasons Why Cinnamon is a Fantastic (Yet Underrated) Linux Desktop Environment

    7 Reasons Why Cinnamon is a Fantastic (Yet Underrated) Linux Desktop Environment

    Linux Mint is one of my favorite distributions. The flagship (or default) Cinnamon desktop is why I like it so much.

    The user experience offered by Cinnamon desktop may not be mind-blowing or fancy. But, the desktop environment provides enough reasons for users to like it and easily work with it to get things done.

    At the end of the day, that’s what we want. A user interface that works as expected and does not get in the way.

    I think Cinnamon desktop does a few things right to give you an exciting experience. Let me mention some of those here.

    If you did not know, the Cinnamon desktop is a fork of the GNOME 3 created in 2011 by Clement Lefebvre (Linux Mint creator) with enhancements over the years.

    1. Familiar User Interface

    linux mint 21 full

    The primary objective of building Cinnamon was to keep the GNOME 2 desktop style alive.

    And that is why you get a familiar desktop layout compared to the most popular consumer desktop operating system, i.e., Windows.

    Of course, Windows 11 has evolved its usual layout with time. But, accessing a start menu, a taskbar, system icons in the tray, and a couple of window decorations make it easy to grasp.

    Whether you are a Windows user or a macOS user, the Cinnamon desktop layout should not feel challenging at all.

    linux mint welcome

    To help you further, the “Welcome Screen” in Linux Mint provides you with all the information quickly.

    2. Lightweight

    To get a comfortable experience with Cinnamon desktop (usually with Linux Mint), you have the following system requirements:

    • 4 GB RAM
    • 100 GB of disk space
    • 1024×768 resolution screen

    In the modern computing age, these specifications should suit almost everyone. So, you do not have to worry about needing an insane amount of memory or disk space to run a Linux distro powered by Cinnamon.

    How to Install Metasploit on ubuntu 20.04

    But, for this article, we consider Linux Mint as the ideal use case.

    3. Fast Performance Without Sacrificing User Experience

    When we think about a lightweight desktop environment—we usually imagine a bland user interface that focuses on performance.

    linux mint perf

    With Cinnamon desktop, that is not the case. It does include subtle animations and features icons/themes that make up for a modern look, if not the best.

    It looks pleasing to the eyes with a minimal approach.

    Typically, I am a sucker for pretty user interfaces, but I can still live with Linux Mint’s straightforward user experience running it on a dual-monitor setup (1440p + 1080p).

    It may not be the best dual-monitor experience with Linux Mint Cinnamon edition (no dock/panel on the second screen for me). So, there is little room for improvement.

    4. Default Customization Options

    You might already know that KDE is probably the king when it comes to giving the ability to customize out-of-the-box.

    We have super useful guides if you are curious about going that way:

    But, for many users, it is overwhelming.

    I think Linux Mint gives the right amount of extra controls/customizations, which you also learn on its Welcome Screen.

    cinnamon theme customize

    Some of the elements that you can easily customize include:

    • Desktop color (accent)
    • Light/Dark theme toggle
    • Panel layout
    • Icons, buttons, and mouse pointer.

    You can head to the system settings and navigate to “Themes” to find the essential tweaks.

    Recommended Read: How to Learn Linux on Easy way

    5. Official Add-ons to Spice Up Your Experience

    cinnamon desklet

    Linux Mint supports various add-ons to enhance your experience. These are all part of its Cinnamon Spices offering. They include:

    • Themes
    • Extensions
    • Applets
    • Desklets

    Applets and Desklets are tiny programs that you can add on top of the panel (near the system tray) and the desktop, respectively.

    applet cinnamon
    System monitoring Applet

    You can manage system default applets or download more from the official repositories:

    applets cinnamon
    Manage Applets

    Similarly, you can add a Desklet from the available defaults or get a new one from the repositories.

    desklet cinnamon
    Manage Desklets

    Plenty of valuable utilities to monitor system resources, check the weather, and more.

    In addition, you get access to various themes built by the community that could easily give you a look you always wanted.

    cinnamon theme

    To complement all the above spices, you can use extensions to make the panel transparent, add a watermark to your desktop, enable windows tiling, and add some exciting window animations.

    linux mint extensions

    6. Compatible and Seamless User Experience

    Why do I highlight the user experience again?

    The best part about Cinnamon desktop is that it evolves in a way that respects and supports all functionalities.

    For instance, if you want to install an app you enjoyed using on KDE Plasma, it should work the same way here. There’s nothing special with Cinnamon desktop that would break the experience.

    gnome accounts cinnamon

    Similarly, the desktop adds features that try to co-exist with services from other desktop environments. For instance, calendar events support using GNOME Online Accounts.

    7. Panel Customization

    linux mint panel

    The dock, taskbar, or panel comprises an integral part of the user interface.

    Yes, other desktop environments allow you to customize the same to some extent. With Cinnamon, you get a good amount of control to tweak it.

    I think you get all the essential options a user would want.

    Wrapping Up

    GNOME and KDE Plasma are popular desktop environments. However, Cinnamon is not far off on essential parts to provide an optimal user experience.

    What do you think of the Cinnamon desktop environment? Do you prefer to try it with Linux Mint? Share your thoughts in the comments section below.


    [ad_2]

  • How to Check if You are Using Wayland or Xorg?

    How to Check if You are Using Wayland or Xorg?


    There’s a technical transition going down within the desktop Linux world.

    Most mainstream distros have began to maneuver to the Wayland show server by default.

    However not all legacy parts are appropriate with the newer Wayland. They work solely with the nice previous X or Xorg show server.

    So, when you find yourself having hassle together with your Linux system, it will be sensible to examine if the issue is coming due to the show server.

    Let me present you the right way to examine which show server you might be utilizing.

    Verify whether or not Wayland or Xorg is in use

    The best and maybe essentially the most dependable approach is to make use of the next command in a terminal:

    echo $XDG_SESSION_TYPE

    If you’re utilizing Wayland, it is best to get ‘wayland’ within the output:

    Also Learn : How I recovered my Linux system using a Live USB device

    [email protected]:~$ echo $XDG_SESSION_TYPE 
    wayland
    
    waylnd

    If you happen to use xorg (X show server), it is best to get x11 within the output.

    [email protected]:~$ echo $XDG_SESSION_TYPE 
    x11
    x 11

    To summarize:

    • Verify the worth of $XDG_SESSION_TYPE variable in terminal
    • For Wayland, you get wayland and for Xorg you get within the output.

    A ridiculous however enjoyable strategy to know in case you are utilizing Wayland on GNOME

    I discovered it on Fedora Subreddit. If you’re utilizing GNOME, press Alt+F2, sort r within the dialogue field and press enter. Usually it restarts the GNOME shell. Nevertheless it received’t work in Wayland. It would show ‘restart isn’t obtainable on Wayland’.

    wayland in gnome
    wayland in gnome

    To Wayland or not?

    GNOME has put a lot emphasis on Wayland to supply a contemporary desktop expertise. Ubuntu, Fedora and plenty of different distros have switched to Wayland by default however many purposes are lagging behind in Wayland assist.

    Many display recorders and screenshot software program don’t work with Wayland. Switching again to Xorg is the one possibility at instances. Fortunately, it’s fairly straightforward to change between Xorg and Wayland. Simply log off and click on the person profile after which click on the gear image on the backside to decide on the session you need.

    Personally, I recommend sticking with what your distribution supplies. Solely swap to the opposite when it’s required.

  • How I troubleshoot swappiness and startup time on Linux

    How I troubleshoot swappiness and startup time on Linux


    I not too long ago skilled one other attention-grabbing drawback within the Linux startup sequence that has a circumvention–not an answer. It began fairly unexpectedly.

    I used to be writing a few articles whereas making some updates to my private copy of my collection of books, “Utilizing and Administering Linux: Zero to SysAdmin.” I had 4 situations of LibreOffice Write open to doing all that. I had three VMs working with VirtualBox to check a few of the issues I used to be writing about. I additionally had LibreOffice Impress open to work on an unrelated presentation. I prefer to hearken to music, so I had one among a number of tabs in Firefox open to Pandora, my music streaming service of alternative. I had a number of Bash shells open utilizing Konsole with quite a few tabs and the Alpine text-mode e mail shopper in a single. Then there have been the varied tabs within the Thunar file supervisor.

    So I had rather a lot happening. Identical to I do now as I write this text.

    The signs

    As I used these open classes, I observed that issues slowed down significantly whereas ready for the system to put in writing a doc to the M.3 SSD–a course of that ought to have been actually quick. I additionally observed that the music was uneven and dropped out utterly each jiffy. Total efficiency was usually poor. I started to suppose that Fedora had a major problem.

    My major workstation, the one I used to be engaged on on the time, has 64GB of RAM and an Intel Core i9 Excessive with 16 cores and Hyperthreading (32 CPUs) that may run as quick as 4.1 GHz utilizing my configured overclocking. So I mustn’t have skilled any slowdowns–or so I believed on the time.

    Decide the issue

    It didn’t take lengthy to seek out the issue as a result of I’ve skilled related signs earlier than on techniques with far much less reminiscence. The difficulty seemed like delays as a consequence of web page swapping. However why?

    I began with one among my go-to instruments for drawback dedication, htop. It confirmed that the system was utilizing 13.6GB of reminiscence for packages, and many of the remainder of the RAM was in cache and buffers. It additionally confirmed that swapping was actively occurring and that about 253MB of information was saved within the swap partitions.

    Date & Time: 2022-08-12 10:53:08
    Uptime: 2 days, 23:47:15
    Duties: 200, 1559 thr, 371 kthr; 4 working
    Load common: 3.97 3.05 2.08

    Disk IO: 202.6% learn: 687M write: 188K
    Community: rx: 0KiB/s tx: 0KiB/s (0/0 packets)
    Systemd: working (0/662 failed) (0/7912 jobs)
    Mem[|||||||##*@@@@@@@@@@@@@@@@@@@@@@@@@@    13.6G/62.5G]
    Swp[||#                                      253M/18.0G]


    However that meant I nonetheless had plenty of reminiscence left the system may use immediately for packages and information and extra that it may get well from cache and buffers. So why was this technique even swapping in any respect?

    I remembered listening to in regards to the “swappiness” think about one among my Red Hat training classes. However that was a very long time in the past. I did some searches on “swappiness” to study in regards to the kernel setting vm.swappiness.

    The default worth for this kernel parameter is 60. That represents the % of free reminiscence not but in use. When the system reaches that 60% set off level, it begins to swap, regardless of how a lot free reminiscence is on the market. My system began swapping when about 0.6 * 62.5GB = 37.5GB of unused reminiscence remained.

    Based mostly on my on-line studying, I found that 10% is a greater setting for a lot of Linux techniques. With that setting, swapping begins when solely 10% of RAM is free.

    I checked the present swappiness setting on my system, and it was set to the default.

    # sysctl vm.swappiness
    vm.swappiness = 60


    Time to vary this kernel setting.

    Repair the difficulty

    I will not dive into the gory particulars, however the backside line is that both of the next instructions, run as root, will immediately do the job on a working Linux pc with out a reboot.

    # sysctl -w vm.swappiness=10

    You might additionally use this subsequent command to do the identical factor.

    # echo 10 > /proc/vm/swappiness

    Tecmint has a superb article about setting kernel parameters.

    Each instructions change the stay kernel setting within the /proc filesystem. After working both of these instructions, you need to run the sysctl vm.swappiness command to confirm that the kernel setting has modified.

    However these instructions solely change the swappiness worth for the at present working system. A reboot returns the worth to its default. I wanted to make sure that this transformation is made persistent throughout reboots.

    However first, the failure

    To completely change the kernel vm.swappiness variable, I used the process described in my earlier article, How I disabled IPv6 on Linux, so as to add the next line to the tip of the /etc/default/grub file:

    GRUB_CMDLINE_LINUX="vm.swappiness=1"

    I then ran the grub2-mkconfig command as root to rebuild the /boot/grub2/grub.cfg file. Nonetheless, testing with VMs and actual {hardware} confirmed that it didn’t work, and the swappiness worth didn’t change. So I attempted one other strategy.

    And the success

    Between this failure at startup time, the one I describe within the How I disabled IPv6 on Linux article, and different startup points I explored as a consequence of encountering these two, I made a decision that this was a Linux startup timing drawback. In different phrases, some required companies, one among which is likely to be the community itself, weren’t up and working, which prevented these kernel possibility adjustments from being dedicated to the /proc filesystem, or they had been dedicated after which overwritten when the service began.

    I may make all of those work as they need to by including them to a brand new file, /and many others/sysctl.d/local-sysctl.conf with the next content material, which incorporates all of my native kernel possibility adjustments:

    ###############################################
    #            local-sysctl.conf                #
    #                                             #
    # Native kernel possibility settings.               #
    # Set up this file within the /and many others/sysctl.d      #
    # listing.                                  #
    #                                             #
    # Use the command:                            #
    # sysctl -p /and many others/sysctl.d/local-sysctl.conf   #
    # to activate.                                #
    #                                             #
    ###############################################
    ###############################################
    # Native Community settings                      #
    # Particularly to disable IPV6                #
    ###############################################
    internet.ipv6.conf.all.disable_ipv6 = 1
    internet.ipv6.conf.default.disable_ipv6 = 1

    ###############################################
    # Digital Reminiscence                              #
    ###############################################
    # Set swappiness
    vm.swappiness = 1


    I then ran the next command, which activated solely the kernel choices within the specified file:

    # sysctl -p /and many others/sysctl.d/local-sysctl.conf
    internet.ipv6.conf.all.disable_ipv6 = 1
    internet.ipv6.conf.default.disable_ipv6 = 1
    vm.swappiness = 13


    It is a extra focused strategy to setting kernel choices than I utilized in my article about disabling IPv6.

    Reporting the bug

    On the time of this writing, there is no such thing as a true repair for the foundation reason behind this drawback–regardless of the trigger. There’s a technique to quickly circumvent the difficulty till a repair is supplied. I used the /and many others/sysctl.d/local-sysctl.conf file that I had created for testing and added a systemd service to run on the finish of the startup sequence, anticipate a number of seconds, and run sysctl on that new file. The main points of how to do this are within the How I disabled IPv6 on Linux article.

    I had already reported this as bug 2103517 utilizing Pink Hat’s Bugzilla when attempting to disable IPv6. I added this new info to that bug to make sure that my newest findings had been obtainable to the kernel builders.

    You’ll be able to comply with the link to view the bug report. You do not want an account to view bug experiences.

    Closing ideas

    After experimenting to see how nicely I may reproduce the signs, together with many others, I’ve decided that the vm.swappiness setting of 60% is way too aggressive for a lot of large-memory Linux techniques. With out much more information factors than these of my very own computer systems, all I can tentatively conclude is that techniques with big quantities of RAM that get used solely occasionally are the first victims of this drawback.

    The fast resolution to the issue of native kernel possibility settings not working is to set them after startup. The automation I carried out is an efficient instance of easy methods to use systemd to exchange the outdated SystemV startup file rc.native.

    This bug had not been beforehand reported. It took a number of days of experimenting to confirm that the overall drawback by which locally-set kernel choices weren’t being set or retained at startup time was simply repeatable on a number of bodily and digital techniques. At that time, I felt it vital to report the bug to make sure it will get fastened. Reporting it’s one other method I may give again to the Linux neighborhood.

  • How I recovered my Linux system using a Live USB device

    How I recovered my Linux system using a Live USB device

    I’ve a dozen or so bodily computer systems in my dwelling lab and much more VMs. I exploit most of those programs for testing and experimentation. I regularly write about utilizing automation to make sysadmin duties simpler. I’ve additionally written in a number of locations that I study extra from my very own errors than I do in nearly every other manner.

    I’ve realized so much over the past couple of weeks.

    I created a serious drawback for myself. Having been a sysadmin for years and written a whole lot of articles and 5 books about Linux, I actually ought to have identified higher. Then once more, all of us make errors, which is a vital lesson: You are by no means too skilled to make a mistake.

    I am not going to debate the main points of my error. It is sufficient to inform you that it was a mistake and that I ought to have put much more thought into what I used to be doing earlier than I did it. Apart from, the main points aren’t actually the purpose. Expertise cannot prevent from each mistake you are going to make, however it could aid you in restoration. And that is actually what this text is about: Utilizing a Reside USB distribution in addition and enter a restoration mode.

    The issue

    First, I created the issue, which was basically a nasty configuration for the /and so forth/default/grub file. Subsequent, I used Ansible to distribute the misconfigured file to all my bodily computer systems and run grub2-mkconfig. All 12 of them. Actually, actually quick.

    All however two did not boot. They crashed through the very early phases of Linux startup with numerous errors indicating that the /root filesystem couldn’t be situated.

    I may use the foundation password to get into “upkeep” mode, however with out /root mounted, it was unimaginable to entry even the only instruments. Booting on to the restoration kernel didn’t work both. The programs had been really damaged.

    Restoration mode with Fedora

    The one method to resolve this drawback was to discover a method to get into restoration mode. When all else fails, Fedora offers a extremely cool instrument: The identical Reside USB thumb drive used to put in new cases of Fedora.

    After setting the BIOS in addition from the Reside USB system, I booted into the Fedora 36 Xfce reside consumer desktop. I opened two terminal classes subsequent to one another on the desktop and switched to root privilege in each.

    I ran lsblk in a single for reference. I used the outcomes to establish the / root partition and the boot and efi partitions. I used certainly one of my VMs, as seen beneath. There isn’t a efi partition on this case as a result of this VM doesn’t use UEFI.

    # lsblk
    NAME          MAJ:MIN RM  SIZE RO TYPE MOUNTPOINTS
    loop0           7:0    0  1.5G  1 loop
    loop1           7:1    0    6G  1 loop
    ├─live-rw     253:0    0    6G  0 dm   /
    └─live-base   253:1    0    6G  1 dm
    loop2           7:2    0   32G  0 loop
    └─live-rw     253:0    0    6G  0 dm   /
    sda             8:0    0  120G  0 disk
    ├─sda1          8:1    0    1G  0 part
    └─sda2          8:2    0  119G  0 part
    ├─vg01-swap 253:2    0    4G  0 lvm
    ├─vg01-tmp  253:3    0   10G  0 lvm
    ├─vg01-var  253:4    0   20G  0 lvm
    ├─vg01-home 253:5    0    5G  0 lvm
    ├─vg01-usr  253:6    0   20G  0 lvm
    └─vg01-root 253:7    0    5G  0 lvm
    sr0            11:0    1  1.6G  0 rom  /run/initramfs/live
    zram0         252:0    0    8G  0 disk [SWAP]


    The /dev/sda1 partition is definitely identifiable as /boot, and the foundation partition is fairly apparent as properly.

    Within the different terminal session, I carried out a sequence of steps to recuperate my programs. The precise quantity group names and system partitions akin to /dev/sda1 will differ to your programs. The instructions proven listed here are particular to my state of affairs.

    The target is in addition and get by way of startup utilizing the Reside USB, then mount solely the required filesystems in a picture listing and run the chroot command to run Linux within the chrooted picture listing. This strategy bypasses the broken GRUB (or different) configuration information. Nonetheless, it offers an entire operating system with all the unique filesystems mounted for restoration, each because the supply of the instruments required and the goal of the adjustments to be made.

    Listed here are the steps and associated instructions:

    1. Create the listing /mnt/sysimage to offer a location for the chroot listing.

    2. Mount the foundation partition on /mnt/sysimage:

    # mount /dev/mapper/vg01-root /mnt/sysimage

    3. Make /mnt/sysimage your working listing:

    # cd /mnt/sysimage

    4. Mount the /boot and /boot/efi filesystems.

    5. Mount the opposite principal filesystems. Filesystems like /dwelling and /tmp usually are not wanted for this process:

    # mount /dev/mapper/vg01-usr usr

    # mount /dev/mapper/vg01-var var


    6. Mount essential however already mounted filesystems that should be shared between the chrooted system and the unique Reside system, which remains to be on the market and operating:

    # mount –bind /sys sys

    # mount –bind /proc proc


    7. You should definitely do the /dev listing final, or the opposite filesystems will not mount:

    # mount --bind /dev dev

    8. Chroot the system picture:

    # chroot /mnt/sysimage

    The system is now prepared for no matter it is advisable to do to recuperate it to a working state. Nonetheless, one time I used to be capable of run my server for a number of days on this state till I may analysis and take a look at actual fixes. I do not actually advocate that, however it may be an choice in a dire emergency when issues simply have to stand up and operating–now!

    The answer

    The repair was straightforward as soon as I received every system into restoration mode. As a result of my programs now labored simply as if they’d booted efficiently, I merely made the required adjustments to /and so forth/default/grub and /and so forth/fstab and ran the grub2-mkconfig > boot/grub2/grub.cfg command. I used the exit command to exit from chroot after which rebooted the host.

    After all, I couldn’t automate the restoration from my mishap. I needed to carry out this complete course of manually on every host—a becoming little bit of karmic retribution for utilizing automation to rapidly and simply propagate my very own errors.

    Classes realized

    Regardless of their usefulness, I used to hate the “Classes Realized” classes we might have at a few of my sysadmin jobs, nevertheless it does seem that I have to remind myself of some issues. So listed here are my “Classes Realized” from this self-inflicted fiasco.

    First, the ten programs that did not boot used a unique quantity group naming scheme, and my new GRUB configuration failed to think about that. I simply ignored the truth that they could presumably be completely different.

    • Suppose it by way of utterly.
    • Not all programs are alike.
    • Check the whole lot.
    • Confirm the whole lot.
    • By no means make assumptions.

    Every thing now works tremendous. Hopefully, I’m just a little bit smarter, too.

  • 10 Tools to Generate and Have Fun With ASCII Art in Linux

    10 Tools to Generate and Have Fun With ASCII Art in Linux

    Linux terminal is not as scary as you think.

    Of course, it could be intimidating in the beginning but once you know the terminal better, you start loving it.

    You are likely to use the terminal for serious work. But there are many fun stuff you can do in the terminal as well.

    One of them is experimenting with ASCII art. You can display predefined or random messages, play games, or run some animation in ASCII format in the Linux terminal using various command line tools.

    My teammate Sreenath likes to explore such unusual CLI tools and share his findings with me. I am sharing those findings with you.

    ascii art tools linux

    Most of these programs should be available in the repositories of your Linux distribution. You can use your system’s package manager to install them. To keep the article concise, I have only included the installation instructions for Ubuntu.

    1. lolcat: Add colors to your terminal

    Alright! lolcat doesn’t have anything to do with ASCII art. At least not directly.

    Still, I included it at the beginning of this article because you can combine other ASCII tools with lolcat.

    So, what does it do? It is similar to the cat command but it adds random gradient colors to its output.

    lolcat

    It may not look useful at the moment but you’ll see its impact when the outputs of other ASCII tools are piped through lolcat.

    Install lolcat with the apt command:

    sudo apt install lolcat

    2. Aewan: Display ASCII text beautifully

    Aewan is a multi-layered ASCII graphics/animation editor. It produces stand-alone cat-able ASCII art files and an easy-to-parse format for integration into terminal applications.

    It has two tools: aewan, an ASCII editor and aecat, for viewing the created file.

    I am not going to discuss the editor part here.

    aewan initial layout
    Aewan ASCII editor

    To display any text in pretty ASCII format, you need the aecat command. Notice the use of letters in the screenshot below.

    aewan output

    To install aewan use the following command:

    sudo apt install aewan

    And then use it like this:

    aecat hello

    3. Cowsay: Make an ASCII cow say whatever you want

    What does the cow say? Whatever you want it to say.

    The cowsay is already a popular tool among seasoned Linux users. It shows an ASCII cow that repeats the text you provide it.

    cowsay

    But you are not restricted to cows only. You can change it to several other characters as well. Like a dragon (burning King’s landing):

    cowsay

    Did you notice the colored output in the above screenshot? That’s the magic of the lolcat command I mentioned earlier.

    To install cowsay, use:

    sudo apt install cowsay

    Once installed, you can use it like this:

    cowsay hello

    You can refer to its man page for additional configuration and options.

    4. jp2a: Convert images into ASCII art

    jp2a is a command-line tool that converts images to ASCII art in the Linux terminal. It works with JPEG and PNG files. It also allows colored output and your selection of character set to appear as ASCII image.

    jp2a

    You can install it using the following command:

    sudo apt install jp2a

    You can get the colorful output and save the ASCII text like this:

    jp2a --output=ascii.txt --colors input.png

    It’s not the only program of this kind. There is ascii-image-converter and several other tools that could be used for the same purpose. I won’t discuss all of them in this list.

    5. linuxlogo: Display the ASCII logo your Linux distro

    The name says it all. It displays the Linux logo in ASCII format.

    No, not our beloved Linux logo, Tux but the logo of your Linux distribution. It also shows a few additional information like Linux kernel version, CPU, RAM, hostname, etc.

    linux logo

    You can install it using the apt command:

    sudo apt install linuxlogo

    Just enter linuxlogo to use the command.

    6. Neoftech: Display the Linux logo along with system info

    The above linuxlogo command is too simplistic. You can amp it up by using Neofetch.

    It displays the distribution in a more pretty way along with several system information like kernel, uptime, desktop environment, theme, icons, etc.

    neofetch

    You can also parse it through lolcat to get rainbow-colored output.

    Install Neoftech using this command:

    sudo apt install neofetch

    And then just enter neoftech to run the command.

    There is also screenfetch, a similar tool to Neofetch. You can use either of them.

    7. fortune: Get your fortune told

    Just kidding! There’s no such thing.

    However, fortune cookies are still fashionable and apparently, people like to read random predictions or teachings.

    You can get a similar feature in the Linux terminal with the fortune command:

    fortune cookie linux

    You can install it using the following command:

    sudo apt install fortune

    Once installed, just enter fortune in the terminal to get a random message.

    8. pv: Make things animated

    This is a classic example of the unintended use of a Linux command. The pv command is used to monitor the progress of data through pipe.

    But you can use it to animate the output of any command. Combine it with some of the above-mentioned commands and you can see the ASCII art appearing on your screen as if it is being typed.

    Don’t get it? Watch this video:

    Install it using the following command:

    sudo apt install pv

    And then use it in the following manner:

    neofetch | pv -qL 200 | lolcat

    The higher the number, the higher will be the speed.

    9. cmatrix: Matrix like animation in ASCII

    Remember the cult geek move Matrix? The green falling code is synonymous with Matrix and hacking.

    You can run an ASCII simulation of the falling code in the Linux terminal with cmatrix command.

    I am sharing a screenshot instead of animation here.

    cmatrix

    You can install it with apt command:

    sudo apt install cmatrix

    Once installed, you can run it with:

    cmatrix

    It starts the animation immediately and it keeps on generating random green text falling and disappearing from the screen. The command keeps on running. To stop the running application, use the Ctrl+C keys.

    10. cbonsai: Grow a bonsai in your terminal

    Got a green thumb? How about growing an ASCII bonsai tree in the terminal?

    cbonsai is a fun Linux command that lets you run bonsai tree growing animation in ASCII format.

    I shared a YouTube Shorts of cbonsai command a few days ago.

    You can install cbonsai using:

    sudo apt install cbonsai

    And then to run the animation, use this command:

    cbonsai -l

    Try some more

    There are many more such fun CLI tools. Heck, there are ASCII games as well. It’s fun to use them at times to amuse people around you.

    Can you put these commands to some good use? Not certain about the usability, but you can add some of them in your .bashrc file so that the command is run as soon as you open a terminal session.

    Many sys-admins do that on shared Linux systems. A program like cowsay or figlet can be used to display a message or system info in a pretty way.

    You may also use some of these programs in your bash scripts, especially if you have to highlight something.

    There could be other usages of ASCII art in Linux. I let you share them with the rest of us here.


    5 reasons to use sudo on Linux

  • 5 reasons to use sudo on Linux

    5 reasons to use sudo on Linux

    On traditional Unix and Unix-like systems, the first and only user that exists on a fresh install is named root. Using the root account, you log in and create secondary “normal” users. After that initial interaction, you’re expected to log in as a normal user.

    Running your system as a normal user is a self-imposed limitation that protects you from silly mistakes. As a normal user, you can’t, for instance, delete the configuration file that defines your network interfaces or accidentally overwrite your list of users and groups. You can’t make those mistakes because, as a normal user, you don’t have permission to access those important files. Of course, as the literal owner of a system, you could always use the su command to become the superuser (root) and do whatever you want, but for everyday tasks you’re meant to use your normal account.

    Using su worked well enough for a few decades, but then the sudo command came along.

    To a longtime superuser, the sudo command might seem superfluous at first. In some ways, it feels very much like the su command. For instance, here’s the su command in action:

    $ su root
    <enter passphrase>
    # dnf install -y cowsay


    And here’s sudo doing the same thing:

    $ sudo dnf install -y cowsay
    <enter passphrase>


    The two interactions are nearly identical. Yet most distributions recommend using sudo instead of su, and most major distributions have eliminated the root account altogether. Is it a conspiracy to dumb down Linux?

    Far from it, actually. In fact, sudo makes Linux more flexible and configurable than ever, with no loss of features and several significant benefits.

    [ Download the cheat sheet: Linux sudo command ]

    Why sudo is better than root on Linux

    Here are five reasons you should be using sudo instead of su.

    1. Root is a confirmed attack vector

    I use the usual mix of firewalls, fail2ban, and SSH keys to prevent unwanted entry to the servers I run. Before I understood the value of sudo, I used to look through logs with horror at all the failed brute force attacks directed at my server. Automated attempts to log in as root are easily the most common, and with good reason.

    An attacker with enough knowledge to attempt a break-in also would also know that, before the widespread use of sudo, essentially every Unix and Linux system had a root account. That’s one less guess about how to get into your server an attacker has to make. The login name is always right, as long as it’s root, so all an attacker needs is a valid passphrase.

    Removing the root account offers a good amount of protection. Without root, a server has no confirmed login accounts. An attacker must guess at possible login names. In addition, the attacker must guess a password to associate with a login name. That’s not just one guess and then another guess; it’s two guesses that must be correct concurrently.

    2. Root is the ultimate attack vector

    Another reason root is a popular name in failed access logs is that it’s the most powerful user possible. If you’re going to set up a script to brute force its way into somebody else’s server, why waste time trying to get in as a regular user with limited access to the machine? It only makes sense to go for the most powerful user available.

    By being both the singularly known user name and the most powerful user account, root essentially makes it pointless to try to brute force anything else.

    3. Selective permission

    The su command is all or nothing. If you have the password for su root, you can become the superuser. If you don’t have the password for su, you have no administrative privileges whatsoever. The problem with this model is that a sysadmin has to choose between handing over the master key to their system or withholding the key and all control of the system. That’s not always what you want. Sometimes you want to delegate.

    For example, say you want to grant a user permission to run a specific application that usually requires root permissions, but you don’t want to give this user the root password. By editing the sudo configuration, you can allow a specific user, or any number of users belonging to a specific Unix group, to run a specific command. The sudo command requires a user’s existing password, not your password, and certainly not the root password.

    4. Time out

    When running a command with sudo, an authenticated user’s privileges are escalated for 5 minutes. During that time, they can run the command or commands you’ve given them permission to run.

    After 5 minutes, the authentication cache is cleared, and the next use of sudo prompts for a password again. Timing out prevents a user from accidentally performing that action later (for instance, a careless search through your shell history or a few too many Up arrow presses). It also ensures that another user can’t run the commands if the first user walks away from their desk without locking their computer screen.

    5. Logging

    The shell history feature serves as a log of what a user has been doing. Should you ever need to understand how something on your system happened, you could (in theory, depending on how shell history is configured) use su to switch to somebody else’s account, review their shell history, and maybe get an idea of what commands a user has been executing.

    If you need to audit the behavior of 10s or 100s of users, however, you might notice that this method doesn’t scale. Shell histories also rotate out pretty quickly, with a default age of 1,000 lines, and they’re easily circumvented by prefacing any command with an empty space.

    When you need logs on administrative tasks, sudo offers a complete logging and alerting subsystem, so you can review activity from a centralized location and even get an alert when something significant happens.

    Learn the features

    The sudo command has even more features, both current and in development, than what I’ve listed in this article. Because sudo is often something you configure once then forget about, or something you configure only when a new admin joins your team, it can be hard to remember its nuances.

    Download our sudo cheat sheet and use it as a helpful reminder for all of its uses when you need it the most.

    Related

    How to Hack Instagram Account in 2020

    Kali Linux – The Best Tool For Penetration Testing?

    An Advanced Phishing Tool !!! Kali Linux Tutorials

  • 5 surprising things I do with Linux

    5 surprising things I do with Linux

    [ad_1]

    When you’re used to one operating system, it can be easy to look at other operating systems almost as if they were apps. If you use one OS on your desktop, you might think of another OS as the app that people use to run servers, and another OS as the app that plays games, and so on. We sometimes forget that an operating system is the part of a computer that manages a countless number of tasks (millions per second, technically), and they’re usually designed to be capable of a diverse set of tasks. When people ask me what Linux does, I usually ask what they want it to do. There’s no single answer, so here are five surprising things I do with Linux.

    1. Laser cutting with Linux

    (MSRaynsford, CC BY-NC 4.0)

    At my nearest makerspace, there’s a big industrial machine, about the size of a sofa, that slices through all kinds of materials according to a simple line-drawing design file. It’s a powerful laser cutter, and I the first time I used it I was surprised to find that it just connected to my Linux laptop with a USB cable. In fact, in many ways, it was easier to connect to this laser cutter than it is to connect with many desktop printers, many of which require over-complicated and bloated drivers.

    Using Inkscape and a simple plugin, you can design cut lines for industrial laser cutters. Design a case for your Raspberry Pi laptop, use these Creative Commons design plans to build a cryptex lockbox, cut out a sign for your shopfront, or whatever it is you have in mind.

    2. Gaming on Linux

    The Lutris desktop client

    Open source has always had games, and there have been some high profile Linux games in the recent past. The first gaming PC I built was a Linux PC, and I don’t think any of the people I had over for friendly couch co-op games realized they were using Linux by playing. And that’s a good thing. It’s a smooth and seamless experience, and the sky’s the limit, depending on how much you want to spend on hardware.

    What’s more is that it’s not just the games that have been coming to Linux, but the platform too. Valve’s recent Steam Deck is a popular handheld gaming console that runs Linux. Better still, many open source software titles have been publishing releases on Steam, including Blender and Krita, as ways to encourage wider adoption.

    3. Office work on Linux

    Linux, like life, isn’t always necessarily exciting. Sometimes, you need a computer to do ordinary things, like when you pay bills, make a budget, or write a paper for school or a report for work. Regardless of the task, Linux is also normal, everyday desktop computer. You can use Linux for the mundane, the everyday, the “usual”.

    You’re not limited to just the big name applications, either. I do my fair share of work in the excellent LibreOffice suite, but on my oldest computer I use the simpler Abiword instead. Sometimes, I like to explore Calligra, the KDE office suite, and when there’s precision design work to be done (including specialized procedural design work), I use Scribus.

    The greatest thing about using Linux for everyday tasks is that ultimately nobody knows what you used to get to the end product. Your tool chain and your workflow is yours, and the results are as good or better than what locked-down, non-open software produces. I have found that using Linux for the everyday tasks makes those tasks more fun for me, because open source software inherently permits me to develop my own path to my desired outcome. I try to create solutions that help me get work done efficiently, or that help me automate important tasks, but I also just enjoy the flexibility of the system. I don’t want to adapt for my tool chain, I want to adapt my tools so that they work for me.

    4. Music production on Linux

    I’m a hobbyist musician, and before I started doing all of my production on computers I owned several synthesizers and sequencers and multi-track recorders. One reason it took me as long as it did to switch to computer music was that it didn’t feel modular enough for me. When you’re used to wiring physical boxes to one another to route sound through filters and effects and mixers and auxiliary mixers, an all-in-one application looks a little underwhelming.

    It’s not that an all-in-one app isn’t appreciated, by any means. I like being able to open up one application, like LMMS, that happens to have everything I want. However, in practice it seems that no music application I tried on a computer actually had everything I needed.

    When I switched to Linux, I discovered a landscape built with modularity as one of its founding principles. I found applications that were just sequencers, applications that were just synthesizers, mixers, recorders, patch bays, and so on. I could build my own studio on my computer just as I’d built my own studio in real life. Audio production has developed in leaps and bounds on Linux, and today there are open source applications that can act as a unified control center while retaining the extensibility to pull in sounds from elsewhere on the system. For a patchwork producer like me, it’s a dream studio.

    5. Retro computing on Linux

    I don’t like throwing away old computers, because very rarely do old computers actually die. Usually, an old computer is “outgrown” by the rest of the world. Operating systems get too bloated for an old computer to handle, so you stop getting OS and security updates, applications start to demand resources your old computer just doesn’t have, and so on.

    I tend to adopt old computers, putting them to work as either lab machines or home servers. Lately, I find that adding an SSD drive to serve as the root partition, and using XFCE or a similar lightweight desktop, makes even a computer from the previous decade a pleasantly usable machine for a lot more work than you might expect. Graphic design, web design, programming, stop-motion animation, and much more, are trivial tasks on low spec machines, to say nothing of simple office work. With Linux driving a machine, it’s a wonder businesses ever upgrade.

    Everybody has their favorite “rescue” distribution. Mine are Slackware and Mageia, both of which still release 32-bit installer images. Mageia is RPM-based, too, so you can use modern packaging tools like dnf and rpmbuild.

    Bonus: Linux servers

    OK, I admit Linux on servers isn’t at all surprising. In fact, to people who know of Linux but don’t use Linux themselves, a data center is usually the first thing that pops into their heads when “Linux” is mentioned. The problem with that assumption is that it can make it seem obvious that Linux ought to be great on the server, as if Linux doesn’t even have to try. It’s a flattering sentiment, but the fact is that Linux is great on servers because there’s a monumental effort across global development teams to make Linux especially effective at what it does.

    It isn’t by chance that Linux is the robust operating system that powers most of the internet, most of the cloud, nearly all the supercomputers in existence, and more. Linux isn’t stagnate, and while it has a rich history behind it, it’s not so steeped in tradition that it fails to progress. New technologies are being developed all the time, and Linux is a part of that progress. Modern Linux adapts to growing demands from a changing world to make it possible for systems administrators to provide networked services to people all over the world.

    It’s not everything Linux can do, but it’s no small feat, either.

    [ Red Hat Enterprise Linux turns 20 this year: How enterprise Linux has evolved from server closet to cloud ]

    Linux isn’t that surprising

    I remember the first time I met someone who’d grown up using Linux. It never seemed to happen for most of the time I’ve been a Linux user, but lately it’s relatively common. I think the most surprising encounter was with a young woman, toddler in tow, who saw whatever geeky t-shirt I was wearing at the time and casually mentioned that she also used Linux, because she’d grown up with it. It actually made me a little jealous, but then I remembered that Unix on a desktop computer simply didn’t exist when I was growing up. Still, it’s fun to think about how casual Linux has become over the past few decades. It’s even more fun to be a part of it.

    Related

    Python Roadmap for Beginners

    An Advanced Phishing Tool !!! Kali Linux Tutorials

    [ad_2]

  • How To Share Files between Windows and Linux Over Network | Samba

    How To Share Files between Windows and Linux Over Network | Samba

    INTRO

    Windows and Linux have no similarity. one has its own pro and con. but when it comes to hackers. they use both of these operating systems. currently, I am using windows and Linux. basically, I am using Windows but I have Linux installed in another laptop that I use with SSH with Windows. But the biggest problem you will face in such a condition is not being able to share files from Windows to Linux or from Linux to Windows.

    It is not just about the local system. you will also encounter this condition in many Windows CTFs where you will have to share some exploit scripts or some Powershell scripts to windows using windows. we are going to use a simple method through command prompt/Powershell.

    Let me suggest you this HTB box “buff“. it hasn’t been retired yet. you can check this out. you can practice all the things here we are going to do in this article. but I am using this on my local system. But you will see that there is no difference.

    ATTACK

    You need to understand why file-sharing is not so easy in Linux and windows through USB and through internal networks. A year back, I wrote an article on how one can read Linux partition with Windows. it happens because of the format of the partition. Linux uses ext4 format which is not very famous and obviously not supported by windows drivers. but Windows uses NTFS format which is more very famous and supported by Linux to read and write into.

    Now you can see that it is even difficult to read and write into Linux using Windows through USB or the same Hard disk. you can imagine how difficult it can be to share a file over a network. by the way, the easiest way to send files over a network is to host it first on an HTTP server. but we are going to use a different technique here. we are going to use the samba protocol to mount the file system of Linux into windows.

    I am going to use a script “smbserver.py” to start the SMB server on Linux. it comes pre-installed in Kali-Linux. if you have any other Linux distribution. you will need to install impacket lib for python. to do so, type this command:

    pip install impacket

    Then you can google the script “smbserver.py”.

    After that, You can run Smbserver on your Linux machine. type this command to start the server:

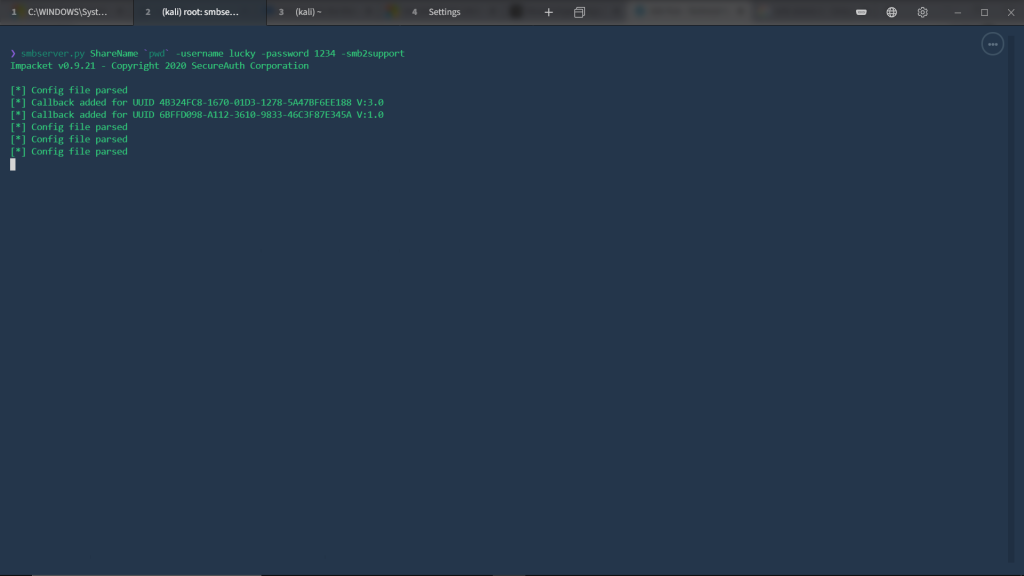
    smbserver.py ShareName `pwd` -username lucky -password 1234 -smb2support
    

    Screenshot:

    How To Share Files between Windows and Linux Over Network | Samba
    How To Share Files between Windows and Linux Over Network | Samba

    The second argument “ShareName” is the share name and the third argument is to tell the server to start in such directory. in our case, we are starting the server in the current directory. -username and -password are the authentication flags. now the thing to notice is the last flag “-smb2support” which runs SMB version 2. sometimes, for some security purposes the windows won’t connect with SMBV1. so, it will be helpful at that time.

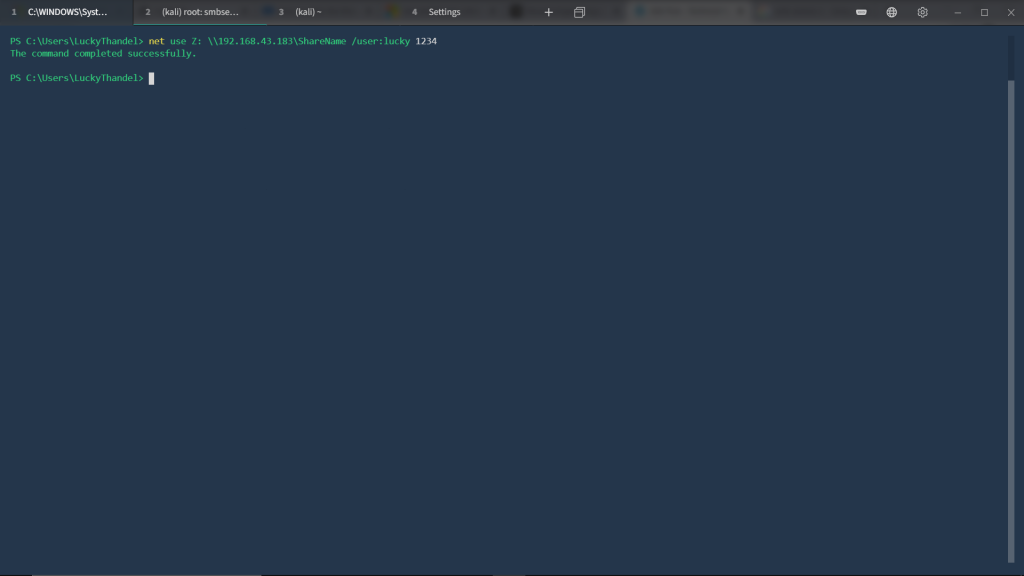
    Now we need to connect to this SMBshare with Windows. so, to do that type this command:

    net use z: \\192.168.43.183\ShareName /user:lucky 1234
    

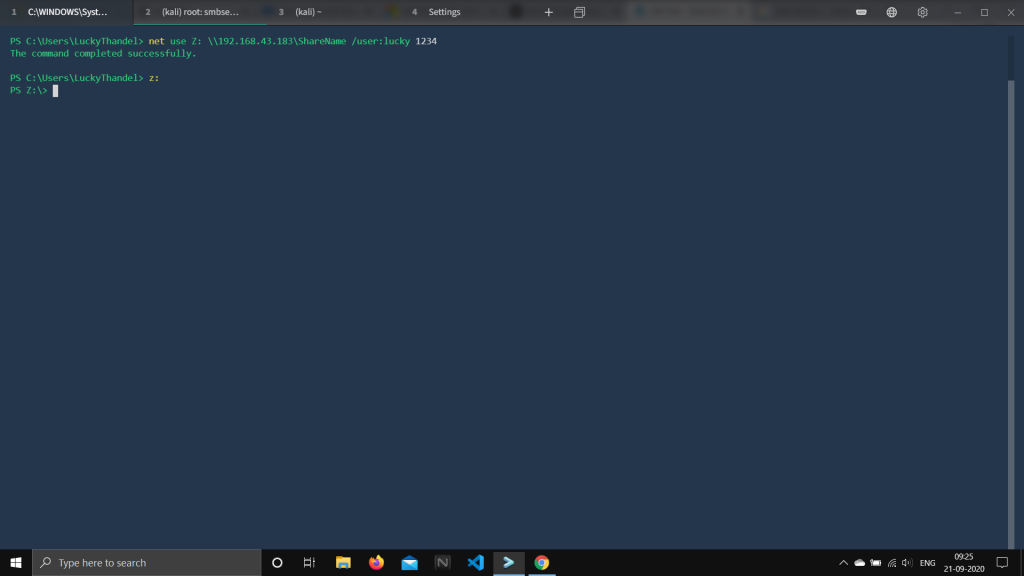
    Well, Windows says that command is successfully executed. so, we can change our drive z:.

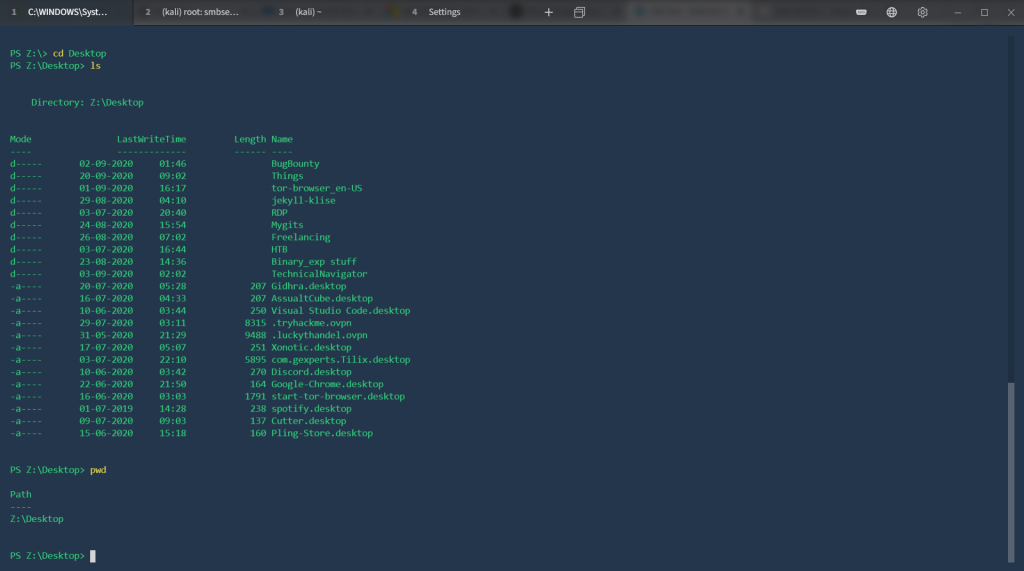
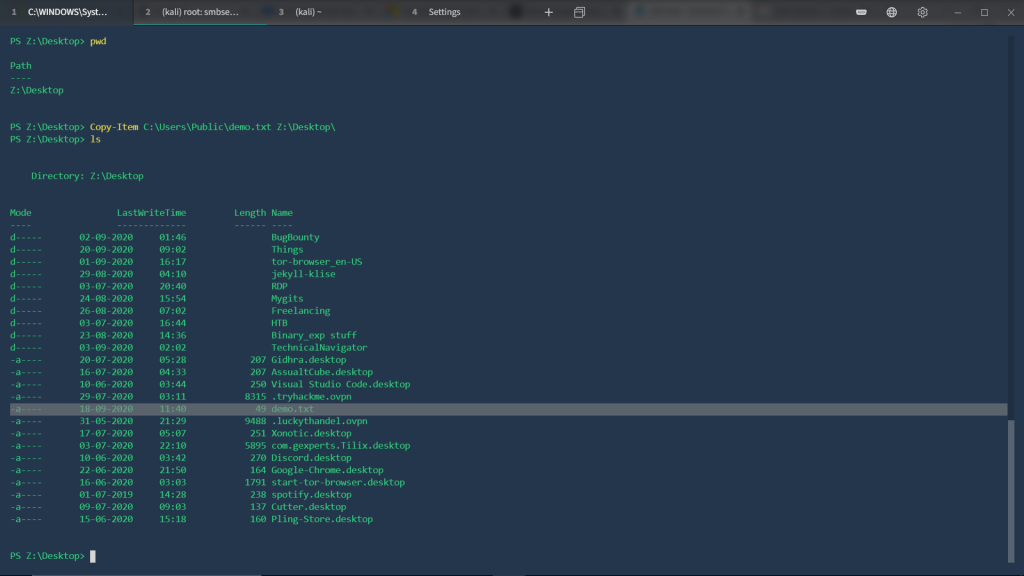
    Now we can list the content here with PowerShell cmdlet “Get-ChildItem“. and we can move into some other directories that our Linux has.

    You can copy any item from Linux to Windows or from Windows to Linux. for example, I have the demo.txt in my Windows and I want to send it to my Linux. To do such a thing, type this command:

    Copy-Item C:\Users\Public\demo.txt Z:\Desktop\

    And that’s how you can share files between Linux and Windows with SMB protocol.

    Thanks For Visiting.

  • How to Learn Linux on Easy way

    How to Learn Linux on Easy way

    So, Hello Friends I know I am Posting the article after long time, just because of some problem but Now i’ll publish the article Regular basis. So Guys Today’s Our topic is How to Learn Linux on easy way ?

    so Guys Be talk about Linux and windows that Why We Use Linux or Learn Linux for Archive a success in hacking ?

    Why Linux Important for Ethical hacking ?

    First of all Linux is an Open source and Most Secure Operating System, Linux are used on every Project and even NSA and Other Research company are also use Linux for there primary Operating system,

    and most of the the hacking tools are made for Linux so if you don’t know how to use Linux.

    A good Percentage of Ethical Hacking tools are written for Linux. This is because using scripting languages such as BASH and lightweight languages such as Python makes it easy to write minimal code that accomplishes a lot. Today, over 90% of hacking tools available are written for Linux.

    So Friends Now you can think if you don’t know How To Run linux OS, then how you can learn Ethical hacking ?

    If You don’t Want to Use linux in Your Main Operating system then You can also Install in on Virtual Machine or you can also Create a small and very handy Linux hacking Machine at very low cost 

    So Now we talk about Our main Topic.

    How to Learn Linux on Easy Way ?

    First of all guys if you really you want to choose ethical hacking carrier then I would recommend you to install Linux as Your Primary Operating system. Because I know if in your life have some other options then you can’t learn Linux. So I would say that Install Linux Today.

    I can Also Give some best Linux Distribution that easy to use and kick start to Learn your Linux. I would prefer two Linux OS that easy to use and its also do almost all work that you can run on your windows pc.

    1. Zorin OS

    So, Many users are already know about this Linux based OS features if You don’t know then don’t worry  I am here to give full details about it.

    Zorin OS is an Linux based operating System, this is an Open source and project that started in 2008 by Artyom and Kyrill Zorin.

    What is the Country of Origin of Zorin OS ?

    The country of Origin of Zorin OS is Ireland.

    Zorin is a smooth open-source OS without any lagging issue and all. UX is also very good as compared to other Linux based OS. It’s quite similar to windows OS so it’s very easy to use for a new user or first-time user. This is because using scripting languages such as BASH and lightweight languages such as Python makes it easy to write minimal code that accomplishes a lot. Today, over 90% of hacking tools available are written for Linux.

    So Guys Zorin OS is an best OS if You want to switch your operating system and also if you don’t know anything about Linux.

    How to learn Zorin OS

    So Guys this is the look if you install Zorin os on your PC, its look like WIndows and Mac os also..

    If you want to see the more features of that OS just go to the official website of Zorin OS 

    2. Ubuntu

    It is also an Linux debian based operating system that comes with best user friendly look and fastest performance with smooth UI (User Interface). It is also open source Operating system and if we talk about the community of Ubuntu. It have large number of Community Official and Un-Official.

    Guys I personally recommended you if you are beginner on Linux then choose this OS. its best and I am also Learn Linux using this OS.

    So I would Recommended to use this if you want to learn linux. but you want to some cool looks UI then go with Zorin that is also best os by look and performance.

    Guys don’t use Kali Linux first because its too advance for those who new to use linux, you can also do all tasks of Kali Linux on Ubuntu OS. So its best choice if you can go with Ubuntu.

    So guys I hope you Like my this Article and guys if you have to ask anything comment down and share our this post with your friends and family.

    For Support me Donate us

    donate us using paypal