Blog

  • How to Scrape Wikipedia Articles with Python

    How to Scrape Wikipedia Articles with Python

    In this article I’m going to create a web scraper in Python that will scrape Wikipedia pages.

    The scraper will go to a Wikipedia page, scrape the title, and follow a random link to the next Wikipedia page.

    I think it will be fun to see what random Wikipedia pages this scraper will visit!

    Setting up the scraper

    To start, I’m going to create a new python file called scraper.py:

    touch scraper.py
    

    To make the HTTP request, I’m going to use the requests library. You can install it with the following command:

    pip install requests
    

    Let’s use the web scraping wiki page as our starting point:

    import requests
    
    response = requests.get(
    	url="https://en.wikipedia.org/wiki/Web_scraping",
    )
    print(response.status_code)

    When running the scraper, it should display a 200 status code:

    python3 scraper.py
    200

    Alright, so far so good! ?

    Extracting data from the page

    Let’s extract the title from the HTML page. To make my life easier I’m going to use the BeautifulSoup package for this.

    pip install beautifulsoup4
    

    When inspecting the Wikipedia page I see that the title tag has the #firstHeading ID.

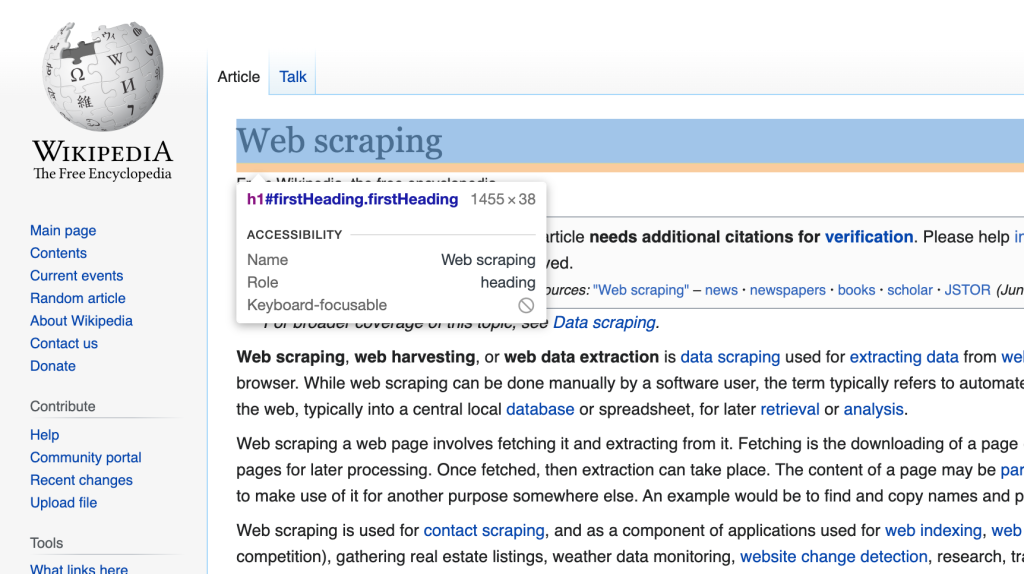
    Beautiful soup allows you to find an element by the ID tag.

    title = soup.find(id="firstHeading")
    

    Bringing it all together the program now looks like this:

    import requests
    from bs4 import BeautifulSoup
    
    response = requests.get(
    	url="https://en.wikipedia.org/wiki/Web_scraping",
    )
    soup = BeautifulSoup(response.content, 'html.parser')
    
    title = soup.find(id="firstHeading")
    print(title.string)

    And when running this, it shows the title of the Wiki article: ?

    python3 scraper.py
    Web scraping

    Scraping other links

    Now I’m going to dive deep into Wikipedia. I’m going to grab a random tag to another Wikipedia article and scrape that page.

    To do this I will use beautiful soup to find all the tags within the wiki article. Then I shuffle the list to make it random.

    import requests
    from bs4 import BeautifulSoup
    import random
    
    response = requests.get(
    	url="https://en.wikipedia.org/wiki/Web_scraping",
    )
    soup = BeautifulSoup(response.content, 'html.parser')
    
    title = soup.find(id="firstHeading")
    print(title.content)
    
    # Get all the links
    allLinks = soup.find(id="bodyContent").find_all("a")
    random.shuffle(allLinks)
    linkToScrape = 0
    
    for link in allLinks:
    	# We are only interested in other wiki articles
    	if link['href'].find("/wiki/") == -1: 
    		continue
    
    	# Use this link to scrape
    	linkToScrape = link
    	break
    
    print(linkToScrape)

    As you can see, I use the soup.find(id=”bodyContent”).find_all(“a”) to find all the tags within the main article.

    Since I’m only interested in links to other wikipedia articles, I make sure the link contains the /wiki prefix.

    When running the program now it displays a link to another wikipedia article, nice!

    python3 scraper.py
    <a href="/wiki/Link_farm" title="Link farm">Link farm</a>

    Creating an endless scraper

    Alright, let’s make the scraper actually scrape the new link.

    To do this I’m going to move everything into a scrapeWikiArticle function.

    import requests
    from bs4 import BeautifulSoup
    import random
    
    def scrapeWikiArticle(url):
    	response = requests.get(
    		url=url,
    	)
    	
    	soup = BeautifulSoup(response.content, 'html.parser')
    
    	title = soup.find(id="firstHeading")
    	print(title.text)
    
    	allLinks = soup.find(id="bodyContent").find_all("a")
    	random.shuffle(allLinks)
    	linkToScrape = 0
    
    	for link in allLinks:
    		# We are only interested in other wiki articles
    		if link['href'].find("/wiki/") == -1: 
    			continue
    
    		# Use this link to scrape
    		linkToScrape = link
    		break
    
    	scrapeWikiArticle("https://en.wikipedia.org" + linkToScrape['href'])
    
    scrapeWikiArticle("https://en.wikipedia.org/wiki/Web_scraping")

    The scrapeWikiArticle function will get the wiki article, extract the title, and find a random link.

    Then, it will call the scrapeWikiArticle again with this new link. Thus, it creates an endless cycle of a Scraper that bounces around on wikipedia.

    Let’s run the program and see what we get:

    pythron3 scraper.py
    Web scraping
    Digital object identifier
    ISO 8178
    STEP-NC
    ISO/IEC 2022
    EBCDIC 277
    Code page 867
    Code page 1021
    EBCDIC 423
    Code page 950
    G
    R
    Mole (unit)
    Gram
    Remmius Palaemon
    Encyclopædia Britannica Eleventh Edition
    Geography
    Gender studies
    Feminism in Brazil

    Awesome, in roughly 10 steps we went from “Web Scraping” to “Feminism in Brazil”. Amazing!

    Conclusion

    We’ve built a web scraper in Python that scrapes random Wikipedia pages. It bounces around endlessly on Wikipedia by following random links.

    This is a fun gimmick and Wikipedia is pretty lenient when it comes to web scraping.

    There are also harder to scrape websites such as Amazon or Google. If you want to scrape such a website, you should set up a system with headless Chrome browsers and proxy servers. Or you can use a service that handles all that for you like this one.

    But be careful not to abuse websites, and only scrape data that you are allowed to scrape.

    Happy coding!

  • How To Share Files between Windows and Linux Over Network | Samba

    How To Share Files between Windows and Linux Over Network | Samba

    INTRO

    Windows and Linux have no similarity. one has its own pro and con. but when it comes to hackers. they use both of these operating systems. currently, I am using windows and Linux. basically, I am using Windows but I have Linux installed in another laptop that I use with SSH with Windows. But the biggest problem you will face in such a condition is not being able to share files from Windows to Linux or from Linux to Windows.

    It is not just about the local system. you will also encounter this condition in many Windows CTFs where you will have to share some exploit scripts or some Powershell scripts to windows using windows. we are going to use a simple method through command prompt/Powershell.

    Let me suggest you this HTB box “buff“. it hasn’t been retired yet. you can check this out. you can practice all the things here we are going to do in this article. but I am using this on my local system. But you will see that there is no difference.

    ATTACK

    You need to understand why file-sharing is not so easy in Linux and windows through USB and through internal networks. A year back, I wrote an article on how one can read Linux partition with Windows. it happens because of the format of the partition. Linux uses ext4 format which is not very famous and obviously not supported by windows drivers. but Windows uses NTFS format which is more very famous and supported by Linux to read and write into.

    Now you can see that it is even difficult to read and write into Linux using Windows through USB or the same Hard disk. you can imagine how difficult it can be to share a file over a network. by the way, the easiest way to send files over a network is to host it first on an HTTP server. but we are going to use a different technique here. we are going to use the samba protocol to mount the file system of Linux into windows.

    I am going to use a script “smbserver.py” to start the SMB server on Linux. it comes pre-installed in Kali-Linux. if you have any other Linux distribution. you will need to install impacket lib for python. to do so, type this command:

    pip install impacket

    Then you can google the script “smbserver.py”.

    After that, You can run Smbserver on your Linux machine. type this command to start the server:

    smbserver.py ShareName `pwd` -username lucky -password 1234 -smb2support
    

    Screenshot:

    How To Share Files between Windows and Linux Over Network | Samba
    How To Share Files between Windows and Linux Over Network | Samba

    The second argument “ShareName” is the share name and the third argument is to tell the server to start in such directory. in our case, we are starting the server in the current directory. -username and -password are the authentication flags. now the thing to notice is the last flag “-smb2support” which runs SMB version 2. sometimes, for some security purposes the windows won’t connect with SMBV1. so, it will be helpful at that time.

    Now we need to connect to this SMBshare with Windows. so, to do that type this command:

    net use z: \\192.168.43.183\ShareName /user:lucky 1234
    

    Well, Windows says that command is successfully executed. so, we can change our drive z:.

    Now we can list the content here with PowerShell cmdlet “Get-ChildItem“. and we can move into some other directories that our Linux has.

    You can copy any item from Linux to Windows or from Windows to Linux. for example, I have the demo.txt in my Windows and I want to send it to my Linux. To do such a thing, type this command:

    Copy-Item C:\Users\Public\demo.txt Z:\Desktop\

    And that’s how you can share files between Linux and Windows with SMB protocol.

    Thanks For Visiting.

  • How to Learn Linux on Easy way

    How to Learn Linux on Easy way

    So, Hello Friends I know I am Posting the article after long time, just because of some problem but Now i’ll publish the article Regular basis. So Guys Today’s Our topic is How to Learn Linux on easy way ?

    so Guys Be talk about Linux and windows that Why We Use Linux or Learn Linux for Archive a success in hacking ?

    Why Linux Important for Ethical hacking ?

    First of all Linux is an Open source and Most Secure Operating System, Linux are used on every Project and even NSA and Other Research company are also use Linux for there primary Operating system,

    and most of the the hacking tools are made for Linux so if you don’t know how to use Linux.

    A good Percentage of Ethical Hacking tools are written for Linux. This is because using scripting languages such as BASH and lightweight languages such as Python makes it easy to write minimal code that accomplishes a lot. Today, over 90% of hacking tools available are written for Linux.

    So Friends Now you can think if you don’t know How To Run linux OS, then how you can learn Ethical hacking ?

    If You don’t Want to Use linux in Your Main Operating system then You can also Install in on Virtual Machine or you can also Create a small and very handy Linux hacking Machine at very low cost 

    So Now we talk about Our main Topic.

    How to Learn Linux on Easy Way ?

    First of all guys if you really you want to choose ethical hacking carrier then I would recommend you to install Linux as Your Primary Operating system. Because I know if in your life have some other options then you can’t learn Linux. So I would say that Install Linux Today.

    I can Also Give some best Linux Distribution that easy to use and kick start to Learn your Linux. I would prefer two Linux OS that easy to use and its also do almost all work that you can run on your windows pc.

    1. Zorin OS

    So, Many users are already know about this Linux based OS features if You don’t know then don’t worry  I am here to give full details about it.

    Zorin OS is an Linux based operating System, this is an Open source and project that started in 2008 by Artyom and Kyrill Zorin.

    What is the Country of Origin of Zorin OS ?

    The country of Origin of Zorin OS is Ireland.

    Zorin is a smooth open-source OS without any lagging issue and all. UX is also very good as compared to other Linux based OS. It’s quite similar to windows OS so it’s very easy to use for a new user or first-time user. This is because using scripting languages such as BASH and lightweight languages such as Python makes it easy to write minimal code that accomplishes a lot. Today, over 90% of hacking tools available are written for Linux.

    So Guys Zorin OS is an best OS if You want to switch your operating system and also if you don’t know anything about Linux.

    How to learn Zorin OS

    So Guys this is the look if you install Zorin os on your PC, its look like WIndows and Mac os also..

    If you want to see the more features of that OS just go to the official website of Zorin OS 

    2. Ubuntu

    It is also an Linux debian based operating system that comes with best user friendly look and fastest performance with smooth UI (User Interface). It is also open source Operating system and if we talk about the community of Ubuntu. It have large number of Community Official and Un-Official.

    Guys I personally recommended you if you are beginner on Linux then choose this OS. its best and I am also Learn Linux using this OS.

    So I would Recommended to use this if you want to learn linux. but you want to some cool looks UI then go with Zorin that is also best os by look and performance.

    Guys don’t use Kali Linux first because its too advance for those who new to use linux, you can also do all tasks of Kali Linux on Ubuntu OS. So its best choice if you can go with Ubuntu.

    So guys I hope you Like my this Article and guys if you have to ask anything comment down and share our this post with your friends and family.

    For Support me Donate us

    donate us using paypal

  • HACKER: ETHICAL HACKING COURSE IN URDU HINDI FREE DOWNLOAD UDEMY COURSE

    Hacker: Ethical Hacking Course in Urdu Hindi. With the help of this course you can Become a Professional Ethical Hacker.

    This course was created by Naeem Hussain. It was rated 4.7 out of 5 by approx 9824 ratings. There are approx 22363 users enrolled with this course, so don’t wait to download yours now. This course also includes 2 hours on-demand video, Full lifetime access, Access on mobile and TV & Certificate of Completion.

    What Will You Learn?

    Able to know all about Ethical Hacking

    After completing you can easy get idea about every thing in Hacking

    You will learn about Hacker: Ethical Hacking Course in Urdu Hindi . Complete guide for Ethical Hackers, How to protect any System, Software, Web Server, Database, Website from Hackers. This course is about security of organization, Company and business. We have cover all point that will help you to become a Certified Ethical hacker.

    Ethical Hacking Course Outline

    Learn about Foot-printing
    Scanning Network
    Enumeration
    System Hacking
    Malware threats
    Sniffing
    Social Engineering
    Session Hijacking
    Hacking Web Server
    DoS Attack
    SQL Injection
    Hacking Wireless Networks
    Hacking Mobile Platforms
    Hacking Web Applications
    Evading IDS
    Cloud Computing
    Cryptography (What is Encryption and Decryption)
    Conclusion
    Overview about Course

    In this course you will learn about footprint (how to get information of computer System).Scanning Network (Find out detail of active host and Its IP address, and Port number). Enumeration (Collect information of any operating System like Username, account information and other). All get knowledge about malware, Learn what is sniffing, Hacking of Software, web server, web applications mobile platforms and networks in this course. Enjoy this course. Good luck.

    Download Link 

    extrahacking.com


  • Ultimate Guide To : Ethical Hacking With Termux

    Ultimate Guide To : Ethical Hacking With Termux

    Hi there , Now You can use Almost all Useful Hacking Tools, Scripts on Your Android Mobile Ultimate Guide To : Ethical Hacking With Termux

    There are several apps and Hacking Tools are available For Android Mobile and therefore We can Install Kali Linux On Our Android but it requires some time and patient.

    Termux Tutorial PDF

    Bonus :

    Download The Ultimate Guide to Ethical Hacking with Termux

    Download Termux Tutorial Pdf

    About Termux App

    Termux is a Powerful Android app which is Designed to Install Linux packages on your Android Mobile

    With this Termux App You Can Install shell, python, c, c++, perl, ruby, java and many more useful packages and with the help of Termux we can use several Hacking Tools/scripts in our mobile including Nmap, Hydra, Sqlmap etc..

    if you are about to use only the tools you needed then read this article completely to Learn How to Use Termux App and How To Install hacking Tools On Your Android mobile with simple termux commands

    Before We drive into deep, you must have to know the termux commands

    Okay, Guys Without wasting your valuable time am going to present you the Termux Commands list in a simple & short way, I was planned to create a Termux commands list pdf, due to lack of time, am posting the commands directly on this post.

    So

    What are Termux Commands?

    in simple words, Termux Commands are the terminal commands, which is executed to perform a particular task. These commands are similar to Linux Commands.

    Termux Commands List :

    Before we drive into deep, let’s start with some cool commands.
    Let’s Learn How To Use Cmatrix effects on Termux

    For That Type Below Command

    pkg install cmatrix

    after that type

    cmatrix

    Ctmatrix effects will be displayed on termux

    Another Cool Command is SL

    Type

    pkg install sl

    After that type sl

    That’s all a small Train will Start Running On Termux

    Now let’s see what are the background running tasks through termux

    Just type below command

    Top

    Now let’s find the factor of any number, for that install below package by typing

    pkg install coreutils

    After that to find the factor of any number then type factor number

    eg: factor 100

    Let’s play with text on termux we can write text in different styles, firstly try with the figlet

    Type

    pkg install figlet

    After that type figlet and type the text you want to write in the figlet style

    For Colourful text, you have to install toilet package for that, type below command

    pkg install toilet

    Afetr that type “your text” You can also try color combination rg toilet -f mono12 -F gay “Your Text”

    Calender in termux, if you can’t to see the calendar in termux then type

    cal

    To see the calendar

    to see the time and date just type date in termux

    Now let’s talk about some helpful commands

    apt update

    This command used to update the termux built-in busybox and other packages

    apt upgrade

    Accessing and managing files in termux

    To manage and access files in termux then you must type below command

    termux-setup-storage

    To access a directory cd command is used
    The termux default directory is located at /data/data/com.termux/
    You can access it anytime by typing cd $home

    ls Command is used to see the list of sub directories

    To access your internal sdcard you have to type cd /sdcard && ls
    To Access your External Sdcard the same command is used cd /sdcard0/ && ls
    To Remove/delete an empty Directory or a file, use this command: rm -rf filename
    Where filename belongs to the name of the file or directory
    Similarly, you can use rm -r filename

    To Make a Directory mkdir Command is used
    Eg: mkdir Hello
    Where Hello Belongs to a Directory Name
    For Copying files from one directory to another, cp Command is used
    eg: cp /path/file /path
    Similarly for moving files mv Command is used
    Termux also Supports zipping and Unzipping of Zip files
    For that zip , unzip Commands are used

    Let’s talk about Networking
    ifconfig Command is used to get all the information regarding your Network IP Address
    To check a particular website is accessible or not in your ISP then you can check that through termux by typing

    ping website
    Eg: ping google.com

    The Interesting thing is you can access the internet through termux, directly in the command line

    Firstly you have to install the w3m package by typing

    pkg install w3m
    After that type below command to access any website

    w3m website

    eg: w3m google.com
    Lynx is similar to w3m
    To install lynx, type pkg install lynx
    After that type lynx google.com

    Now In this Section i will teach you How To Install Useful Packages/Hacking Tools On your Android mobile

    How To Use Hacking Tools in Termux

    Firstly Download and Install Termux App On your Mobile from Play store

    It doesn’t Matter your mobile is Rooted or Non Rooted

    After Downloading Open Termux

    Now Type

    apt Update && apt upgrade

    And hit Enter

    Now Type

    termux-setup-storage

    Now You are Ready To install useful packages and hacking Tools on your Mobile, we are sharing some of the tools with their installation and simple commands in termux

    How To Install NMAP tool in Termux

    In Termux you can Use git to directly cloning files from github or you can manually download files to your sdcard and Use

    Nmap is a Information Gathering and Vulnerability Scanner Tool , to install nmap in termux type below command

    pkg install nmap

    After that it will take few minutes to install after installation you can use nmap on termux by typing nmap in termux

    You can use nmap in termux for scanning targets on your mobile and also for basic attacks

    How To Install Hydra in Termux

    Hydra is is Good Tool for Brute force Attack , hope you might already known about it and you may not need more info about hydra

    To install Hydra in Termux just type command

    Pkg install Hydra

    it takes few minutes to install , after installation

    Just type Hydra in Termux to start using termux

    How To Install RED_HAWK Tool in Termux

    Red_Hawk
    Ultimate Guide To : Ethical Hacking With Termux

    As you know RED_HAWK is a good Information Gathering Tool written in Php

    Red Hawk is used for Website Information Gathering such as who is Lookup , Reverse IP Lookup , xss, sqli scanning etc

    To install RED_HAWK follow below steps

    To use Red Hawk you Need Php environment so type below command

    Pkg install php

    During installation you will be asked : termux will use some space on your device just simply type y for Yes

    After type


    pkg install git

    git is used to directly cloning files from github or you can download scripts, tools from github or other sources and use

    Then type the command in termux

    git clone https://github.com/Tuhinshubhra/RED_HAWK.git

    After success response

    Find the Directory of RED_HAWK

    type cd

    Then type ls

    Type in Termux

    Chmod +x RED_HAWK

    After

    type


    cd RED_HAWK

    Now Type ls

    Then again type chmod +x rhawk.php

    Finally type this command in Termux to use

    php rhawk.php

    That’s all Now You are able To use RED HAWK in your Mobile

    How To Install Lazymux In Termux

    Lazymux contains Several Hacking Tools of Kali Linux at One Place so now its easy to Install Lazymux In Termux

    Lazymux Contains the Following Hacking Tools

    [01] Sudo [11] SQLMap
    [02] NMap [12] Black Hydra
    [03] Hydra [13] Fl00d & Fl00d2
    [04] FB Brute Force [14] Infoga
    [05] Webdav [15] LANs.py
    [06] RED HAWK [16] Pagodo
    [07] Brutal [17] FBUP
    [08] Metasploit [18] KnockMail
    [09] 1337Hash [19] Ufonet
    [10] IPLoc [20] Commix

    [21] D-Tect [31] ReconDog
    [22] A-Rat [32] Meisha
    [23] Torshammer [33] Kali NetHunter
    [24] Slowloris [34] Ngrok
    [25] DSSS [35] Weeman
    [26] SQLiv [36] Cupp
    [27] Wifite [37] Hash-Buster
    [28] Wifite 2 [38] Routersploit
    [29] MSFPC [39] Ubuntu
    [30] Kwetza [40] Fedora

    Follow Below Steps To Do So

    Firstly Download

    Termux App

    Then Type this Command

    apt Update && apt upgrade

    Now We have to Install git by typing this command

    pkg install git

    Then Now We need Python2 environment in Termux so type the command pkg install python to install python

    Now almost done type below command to install Lazymux on Termux

    git clone https://github.com/Gameye98/Lazymux

    After Cloning successful

    Type below command to find the Lazymux Directory

    cd Lazymux && ls

    Now you have to type below command for menu of Lazymux Hacking Tools

    python lazymux.py

    Now select your Desired Tool To Install and use

    Also Read: How to create Bin for Netflix

    Note you’re installed tools will be save to Lazymux Directory so always check the Lazymux directory after installing tools

    Now its Possible even To Install Metasploit Frameworks and Many Other Hacking Frameworks in Termux

    Hope you guys liked this tutorial and Wanted to Know more about all the available Hacking Tools for Termux Just Join Our Telegram For More Updates

    Telegram

  • How to Make Google RDP for Free

    How to Make Google RDP for Free

    Hello Guys and Welcome Back on our New Method here I am teach you How to Make Google RDP for Free

    What is RDP?

    Remote Desktop Protocol (RDP) is a proprietary protocol developed by Microsoft which provides a user with a graphical interface to connect to another computer over a network connection. The user employs RDP client software for this purpose, while the other computer must run RDP server software.

    If you Guys Want to Know more About RDP just Visit

    How To Connect RDP on Your Windows?

    All Windows PC or Windows servers have the Remote Desktop Connection (RDP) tool available as part of the default installation. That include older versions of Windows such as windows 7 and 8. If you want to connect to a windows Remote Desktop using another windows PC, you can use this tool.

    To connect to a Windows Remote Desktop on another Windows PC or Server


    1. Press Windows key + R on your keyboard, type mstsc into the Run dialog box, then press OK to launch the Remote Desktop Connection tool. Alternatively, press the Start button, then press Windows Accessories > Remote Desktop Connection.
    2. Type the IP address or hostname of your Windows Remote Desktop in the Computer text box, then press Show Options.
    3. Type the username you’ll use to connect to your Windows Remote Desktop in the User name box.

    How to Connect Windows Remote Desktop on MacOS ?

    Microsoft offers its own Remote Desktop app for macOS, which can be installed from the App Store. The interface for the Microsoft Remote Desktop app is similar to the iOS and Android clients offered by Microsoft for mobile users, so many of the steps below will be similar on those platforms.

    To connect to a Windows Remote Desktop using the Microsoft Remote Desktop app on macOS:

    1. Click the Add PC button (if you haven’t already added a remote connection) or press the + button > Add PC.
    2. Type the hostname or IP address for your Windows Remote Desktop in the PC name box.
    3. To add a username and password to your connection, click the User account drop-down menu and select Add a user account. Provide the username and password you’ll use to connect, then press the Add button.
    4. If you’re connecting to an RDP server on an enterprise network, you may need to provide a Remote Desktop Gateway address. You can add this by selecting Add Gateway under the Gateway drop-down menu.
    5. Confirm the display quality, resolution, and color settings under the Display tab.
    

    How to Connect RDP on Mobile?

    1. First of all Download RD client Application from Playstore.
    2. Now Tap + icon on top corner.
    3. Then Enter The IP.
    4. Enter User Name and Password.

    Now you Know How to Connect RDP on every Devices. Now we discuss about Method of RDP.

    Method of How to Make Google RDP for Free.

    Requirements:-

    • Minimum 90 Days Old Google Account.
    • Internet Connection.
    • PC or Mobile Device with RDP software.

    Steps:-

    • Go to Cloud.google.com And Sign In With Your Google Account.
    • Choose India in The Country List.
    • Set Your Status To Individual And Tax Payer Status to Unregistered. Leave The Pan # Empty.
    • Fill Any Indian Address And Any 10 Digits Phone Number.
    • Now Come To Credit Card Section.
    • Go To Nasmo-gen
    • And Paste This Cc Bin Into it: 547115xxxxxxxxxx (Airtel Payments Bank Bin).
    • Generate Credit Cards And Paste One Into The Credit Card Section Of Google Cloud Website.
    • Enter Any Date And Proceed.
    • Now a New Window Will Open And It Will Ask For Cvv.
    • Enter Any 3 Digits Number And Proceed.
    • Now One More Window Will Appear And Will Ask You To Verify Your Card.
    • Wait For a Minute And Close The Window Also The cvv Window.
    • Now Go To console.cloud.google.com.
    • You Have Successfully Created a Google Cloud Account.

    Steps to Get VPS.

    • Go to Console Of Your Google Cloud Account.
    • Click On ‘Compute Engine‘ On The Left Side And Then Create a New Vm Instance.
    • Create The Instance. Select Your Memory And Operating System.
    • Click On Create. Now Wait For Some Time.
    • Congrats You Have Successfully Created a VPS Of Google Cloud.
    Note: The Google cloud account must be 90 days Older Otherwise Google Will Ask You To Upload Documents For Your Card And This RDP Will Work Only For 10 Days So After 10 Days Repeat This Process Other Google Account.
    
    Join Our Telegram Channel For More Carding and Hacking Stuffs.
    Join telegram

  • Hackers Favourat Operating System

    Hackers Favourat Operating System

    Hello Guys, How are you? I Hope you all are fine. here I am discuss about Hackers Favourat Operating System. Lets Start !!

    The hackers have their own operating system with many hacking tools and cracking tools.

    These operating systems are equipped with most powerful hacking tools from well known underground hackers groups and ethical hacking companies.

    These 6 best hackers operating system are using by hackers.

    The tools within these best hackers operating system are updated and ready to help you become a real hacker, penetration tester.

    What is Operating System?

    An operating system (OS) is system software that manages computer hardware, software resources, and provides common services for computer programs. … The dominant desktop operating system is Microsoft Windows with a market share of around 82.74%.


    Top 6 Hackers Favorate Operating System

    1. Kali Linux

    Kali Linux is an open source project that is maintained and funded by Offensive Security,a provider of world-class information security training and penetration testing services.

    In addition to Kali Linux, Offensive Security also maintains the Exploit Database and the free online course, Metasploit Unleashed.

    You Also See Full Course of Kali Linux


    2. BackBox Linux

    That is 3-based distribution that is speedy and simple to use. Its is a fully funcational Linux distro that comes well stocks

    ed with standard Software.

    BackBox is more than an operating system,

    it is a Free Open Source Community project with the aim to promote the culture of security in IT environment and give its contribute to make it better and safer.

    All this using exclusively Free Open Source Software by demonstrating the potential and power of the community.

    3. Back Track Linux

    The evolution of BackTrack spans many years of development, penetration tests, and unprecedented help from the security community.

    BackTrack originally started with earlier versions of live Linux distributions called Whoppix, IWHAX, and Auditor.

    When BackTrack was developed, it was designed to be an all in one live hacking CD used on security audits and was specifically crafted to not leave any remnants of itself on the laptop.

    It has since expanded to being the most widely adopted penetration testing framework in existence and is used by the security community all over the world.

    4. BlackArch Linux

    DEFT (acronym for Digital Evidence & Forensics Toolkit) is a distribution made for Computer Forensics,

    with the purpose of running live on systems without tampering or corrupting devices (hard disks, pendrives, etc…)

    connected to the PC where the boot process takes place.

    The DEFT system is based on GNU Linux,

    it can run live (via DVDROM or USB pendrive), installed or run as a Virtual Appliance on VMware or Virtualbox.

    DEFT employs LXDE as desktop environment and WINE for executing Windows tools under Linux.

    5. NST – Network Security Toolkit

    NST is a bootable ISO live DVD/USB Flash Drive based on Fedora Linux.

    The toolkit was designed to provide easy access to best-of-breed Open Source Network Security Applications and should run on most x86_64 systems.

    The main intent of developing this toolkit was to provide the security professional and network administrator with a comprehensive set of Open Source Network Security Tools.

    The majority of tools published in the article: Top 125 Security Tools by INSECURE.ORG are available in the toolkit.

    An advanced Web User Interface (WUI) is provided for system/network administration, navigation, automation, network monitoring, host geolocation, network analysis and configuration of many network and security applications found within the NST distribution.

    In the virtual world, NST can be used as a network security analysis validation and monitoring tool on enterprise virtual servers hosting virtual machines.

    I hope You Like these 6 Hackers Favourat Operating System.

    If you want daily hacking tutorial and want to learn ethical hacking then Join our telegram channel and also we are sharing free udemy courses, so don’t forget to join our telegram channel.

    Join telegram


  • How to get Real Instagram Followers Free in 2020

    How to get Real Instagram Followers Free in 2020

    Many People searching om the internet How to get real Instagram Followers Free in 2020.

    So Hello and Welcome again on our fresh and new blog artical How to get real instagram followers. Only you need to follow my steps and you can get your real instagram followers absolutely free in 2020.

    Now I am starting the Method but if you not joined our telegrame channel Just click on this Blue Button and Join our telegram channel and win so many giveaways and So many Tips and Tricks absolutely free.

    Telegram

    And guys one more New Announcement for you guys Now we are Launched New Website called Extra Hacking Shop.

    So Guys What can do Extra Hacking Shop?

    So my dear Lovely Reader On This website You can Purchase so many Premium Accounts and other Stuffs at very Chep rate. with guaranty.

    So many peoples already purchased and happy with us !

    Extra Hacking Shop

    How to get Real Instagram Followers Free in 2020

    Guys Follow the Steps Carefully.

    Step 1: Make fake instagram Account with any tempmail website.

    Step 2: Now open these two website

    1. https://link.extrahacking.com/4
    2. https://link.extrahacking.com/5

    Step 3: Login your fake account on these website.

    Step 4: Now after Login Click on Add followers.

    Step 5: Now Enter your real instagram Username and Click on Yellow Button.

    Step 6: Now Enter Followers how many you need enter only 15 followers and gain Click on Yellow button.

    Step 7: Do same method on 2nd website.

    Note: But in 2nd website enter 20 followers

    Now you get 15+20=35 followers in just mins

    Now repeat This Proccess and you can increase your instagram followers and show off with your friends.

    So Guys If you Like this Method Just Share This Post with your Friends and family.

    And Don’t forget to Visit Our Shop Extra Hacking Shop.

    Telegram

  • Whatsapp New Features in 2020

    Whatsapp New Features in 2020

    Hello guys Today i am introducing Whatsapp New Features in 2020. So Guys recently whastapp Tweet with new and Usefull Features, We are discuss and explain a new whatsapp Features.

    So guys we know whatsapp is most popular messaging platform world wide, its 1Billion downloads in playstore.

    Also Read : How to do DDos in Android

    Whatsapp New features in 2020

    Whatsapp Release UPI Options

    Whatsapp New Feature 2020
    Whatsapp New Feature 2020

    First of all whatsapp introducing a new features for Indians peoples Only, so Guys if you are Indian then share this artical with your friends and family. So guys Whatsapp finally release UPI Payment Options. Now you can send and receive Money buys using whatsapp payment Option.

    For using UPI in whatsapp first of all update your whatsapp in playstore.

    After update you can see the Payment option in three dot option, tap here and link your bank account as like PhonePe and Google pay and other UPI option. you can also See the payment option on every Chat like this Image.

    Whatsapp New Disappearing Feature

    Now whatsapp Release Disappearing Feature, You can use this Feature to Disappear Message of last 7 days. you can see this Feature to under Profile Section. This feature can help you to delete the message of last 7 days, like Telegram, But in Telegram you can delete message any time but in whatsapp Disappearing Feature You can delete of last 7 days only. How did You Like this Feature, Comment below.

    Storage Manage Feature

    Now you can see Storage Manage feature on the Whatsapp, by using this feature you can manage all image, Video and other Big files that means you can easily delete unwanted files like Image video pdf and other files too.

    This new storage management tool can be found in Setting > Storage data > manage Storage

    Whatsapp New Feature 2020

    This Feature is Really Helpfull Because we can storage more and more unwanted or unnecessary files and these files can full our storage, but we can use this storage management tool for delete files, and you can filtered big to small files and select all the files which you can want to delete from your phone.

    If you can Like this Feature Share This blog with your Friends and Family.

    Easy Search Feature

    Whatsapp easy to find any files like (Image, Gif, Video, Audio, Documents, Links) on whatsapp, You can see The Example on give Screenshorts.

    Whatsapp New Feature 2020
    Whatsapp New Feature 2020

    Mute Forever New Feature

    Whatsapp Introduce new feature Mute Forever, That means you can mute any chat forever, in previous whatsapp update we mute chat only 1 Week maximum, but now you can mute any chat forever life time.

    Whatspp new feature 2020
    Whatspp new feature 2020

    I thing this is also a good feature, But i want your Opinion, can you Like this Feature just comment below with your opinion.

    If you want more Updates Join our Telegram Channel

    Telegram

  • How to Use Your iPhone for Control your Mac or iPad

    How to Use Your iPhone for Control your Mac or iPad

    Hello Guys I am Rk, and Today i can post How to Use iPhone for Control your mac book or iPad like you can lock, unlock, Browse files, Play Music that means you can control all these think with you single iPhone.

    Your iPhone and Mac can speak to each other in many ways, allowing you to start work on one device and seamlessly switch to the other, share clipboards between the two, and pick up phone calls and answer text messages on both. The compatibility is incredible, but there’s even more you can do by incorporating third-party software into the mix.

    By configuring a few settings on your macOS computer and installing Momentous Studio’s free app called Gateway onto your Mac and iPhone, you can remotely control your computer from your iPhone. That means you can do things like putting your Mac to sleep, locking its screen, restarting it, shutting it down, muting its audio, and changing its volume.

    How to use Your iPhone to Control your macbook or iPad?

    Step 1: Download Gateway Desktop for Mac

    The first half of the getway software is a Desktop client that you can download for free from the Momentous Studio website or the link below directly. It’s not avilable in the Mac app store, so you need to get it from the site or below.

    The app only works on macOS 10.13 High Sierra and later.

    Step 2: Install Gateway Desktop for Mac

    Double-Click the DMG file you just downloaded (which should be in your “Downloads” folder) to begain the installation process. When the disk image opens in a new windows, add Gateway Desktop to your “Applications” folder, which is as easy as dragging the software icon over to the folder icon.

    Now, from your “Applications” folder, double-click on Getway Desktop. Because the software is from a third party, Apple will ask you if you’re sure you want to Open it. Click “Open” to continue. (You may need to adjust your Gatekeeper settings if you don’t see the “Open” option.)

    Step 3: Give Gateway Desktop Full Disk Access

    The first time you open Gateway Desktop, it will talk you through some information.

    On the last page, it’ll ask you for a few permissions. First, the app need “Full Disk Access,” Which is necessary if you want to be able to intreact and control your Mac from your iPhone. You can click on the arrow button to open up your “Security & Privacy” settings to begain.

    If you hit “Next intead, You can get to the settings manually. Before doing so, click on the Gateway Desktop icon on your Mac’s menu bar, click the ellipsis, then “Quit.” Doing so now means you won’t be asked to do so later.

    Open up system Perferences, then click “Security & Privacy.” Next, make sure you’re on the “Privacy” tab, choose “Full Disk Access” from the left pane. If your settings are locked, click the lock in the bottom left, enter your user password, and click “Unlock” so that you can make changes.

    Next, If you don’t see Gateway in the list of apps, click on the plus (+) sign, find and select “Gateway Desktop,” choose “Open,” and make sure the box next to it is checked.

    Step 4: Give Gateway Desktop Accessibility Access without closing out of locking your settings, you’ll want to give Gateway Desktop “Accessibility” access too.

    This also allows Gateway to control your Mac for you from your iPhone requests, So choose “Accessibility” from the left pane, then check “Gateway” on the list. If it’s not there, click the plus (+) button, select “Gateway Desktop,” and hit “Open.” Feel free to click the lock in the bottom left to prevent any further changes, and exit System Preference.

    Step 5: Trun gateway Desktop back on Gateway Desktop needed to be off for the above preferences to take effect, so if you didn’t close it before, do do now.

    Then, Open it back up from the “Applications” folder.

    Step 6: Choose a password for remote Access(Optional)

    WIth gateway desktop open and running on your mac, click on its icon in the menu bar, click the ellipsis, then select “settings.” Make sure you’re on the “Security” tab in the new window, then enter a password in the field, and exit the settings. This step is optional since you don’t need a password, but it’s an extra layer of security, so it’s recommended.

    Step 7: Install gateway for iPhone

    The Mac side of things is almost ready, but now it’s time to install the Gateway app on your iPhone. While the desktop app isn’t available in the Mac App Store, the iPhone app is available in the iOS App store. It requires iOS 13.2 or later and is comatible with the iPhone, iPad and iPod touch.

    Step 8: Find Your Mac in tehe Gateway Control

    Open the Gateway app on your iPhone, then wait for your mac to appear. If you don’t see it, make sure that your Mac and iPhone are on the same Wi-Fi network, then try again. Your Mac’s default name and IP address will be listed when the device is found. Tap that, and you’ll be prompted to enter your password and hit “Connect”. If you didn’t set up a password yet, just tap “Connect” without one.

    Step 9: Use Gateway to control Your Mac Remitely

    When you have access to your Mac in your iPhone’s app, you’ll see the system Control remote. With this remote, you can do all of the following. Just note that when you select specific feature, you’ll need to grant more privileges to the Gateway Desktop on your Mac before you can use them (view Step 11 to see how).

    Sleep: This will put your computer’s screen to sleep without locking it.

    Restart: This will restart your computer.

    Lock Screen: This will lock the screen so that it’s password-protected.

    Shut Down: This will turn your computer off completely.

    Mute: this will silence all audio coming from the computer.

    Volume: This slider lets you change the volume of the audio coming from the computer.

    Step 10: Add More Controls for your Mac

    Those are just the basic features abouve. If you don’t mind spending a few bucks, check out the shopping cart icon to view the Gateway Store. Here, you’ll find one-time purchse, called “Blocks,” that add capabilities to your remote access. Some of them are free, including Apple Music, Podcasts, Screenshot, VLC, and Force Quit.

    After you add Blocks, you’ll see them on the main System Control screen for your Mac. You can tap the Blocks icon up top to view them all in a short list, where you can drag and drop to reorder how they appear in the remote. Tap “Done” to exit these settings

    Step 11:

    Give Gateway Desktop More Privileges

    We won’t go into how every control or Block works, so you can play around with those to see how they operate. However, some of them will require more privileges on your Mac. Specifically, “System Events” for “Automation,” which controls interface elements by simulating keyboard and mouse actions.
    Whenever you come across one of these apps for the first time, you’ll get a prompt on your Mac to give it access. Click “OK” to do so. You can see these privileges in System Preferences –> Security & Privacy –> Privacy –> Automation. Once you give it permissions once, it should work for any future Blocks you use.

    Momentous Studios does not store any of your data or requests, so that should give you a little peace of mind. According to the devs, “all data is stored locally on your devices,” and you can view its privacy policy for more information.
    As of right now, the only downside to Gateway is that your iPhone and Mac have to be on the same WLAN network. If you want true remote access control, away from home, that’s not possible with Gateway yet. Hopefully, it incorporates a way to SSH (Secure Shell) into the Mac remotely from the iOS app. Until then, if you want that kind of access right now, you could try Chrome Remote Desktop, which turns your iPhone into a “mouse” and “trackpad” for your Mac as long as the Chrome Remote Desktop client is running on the Mac.

    If you Want more Updates just Join our Telegram Channel

    Telegram